## How Do You Take Acrylic Nails Off: A Definitive Guide to Safe and Effective Removal
Tired of your acrylic nails but can’t make it to the salon? Removing acrylic nails at home can seem daunting, but with the right knowledge and techniques, you can safely and effectively remove them without damaging your natural nails. This comprehensive guide will walk you through various methods for **how do you take acrylic nails off**, providing step-by-step instructions, expert tips, and crucial precautions to ensure a smooth and healthy removal process. We aim to provide a superior resource, detailing the safest and most effective methods, and offering insights beyond the typical DIY guide. Our team has extensively researched and tested these methods to bring you the most reliable information. This guide will cover everything you need to know, from understanding the different types of acrylics to preventing damage during removal. By the end of this article, you’ll be equipped with the knowledge and confidence to remove your acrylic nails like a pro.
This guide will cover the following topics:
* Understanding Acrylic Nails
* Essential Tools for Removal
* Safe and Effective Removal Methods (Acetone Soak, Dental Floss Method, Filing)
* Post-Removal Care for Healthy Nails
* Common Mistakes to Avoid
* Expert Tips and Tricks
* Frequently Asked Questions
Let’s get started!
## Understanding Acrylic Nails: A Foundation for Safe Removal
Before diving into **how do you take acrylic nails off**, it’s crucial to understand what acrylic nails are and how they’re applied. Acrylic nails are artificial enhancements made from a combination of a liquid monomer and a powder polymer. This mixture creates a hard, durable layer that’s applied over the natural nail, extending its length and providing a smooth surface for polish or designs. Understanding their composition is vital, as it dictates the best removal techniques. Unlike gel nails, which are cured under UV light, acrylics harden through a chemical reaction. This difference is crucial because gel nail removal requires different products and techniques.
The process of applying acrylic nails typically involves:
1. Preparing the natural nail by buffing and filing.
2. Applying a primer to help the acrylic adhere.
3. Mixing the liquid monomer and powder polymer to create a bead of acrylic.
4. Applying the acrylic to the nail, shaping it as desired.
5. Filing and buffing the acrylic to create a smooth surface.
6. Applying polish or other nail enhancements.
The strength and durability of acrylic nails are what make them appealing, but they also make removal a bit more challenging. Attempting to peel or rip them off can severely damage the natural nail, leading to thinning, weakness, and even infection. Therefore, understanding the proper removal techniques is essential for maintaining healthy nails.
## Essential Tools for Safely Removing Acrylic Nails
Having the right tools on hand is paramount for a successful and damage-free removal. Here’s a list of essential tools you’ll need when considering **how do you take acrylic nails off**:
* **100% Acetone:** This is the most effective solvent for breaking down acrylic. Make sure it’s pure acetone, not nail polish remover, which contains only a small percentage of acetone.
* **Nail Clippers:** For trimming down the length of the acrylic nails before soaking.
* **Nail File (100/180 grit):** For filing away the top layer of the acrylic to allow the acetone to penetrate more easily.
* **Buffing Block:** For smoothing out the surface of the natural nail after removal.
* **Cotton Balls:** To soak in acetone and apply to the nails.
* **Aluminum Foil:** To wrap around the cotton balls and nails, trapping the acetone and accelerating the dissolving process.
* **Orange Wood Stick or Cuticle Pusher:** For gently lifting the softened acrylic from the natural nail.
* **Petroleum Jelly or Cuticle Oil:** To protect the skin around the nails from the drying effects of acetone.
* **Warm Water and a Bowl:** For creating a warm water bath to place the acetone-soaked nails in, further speeding up the removal process.
* **Towel:** To protect your work surface.
Investing in quality tools will make the removal process easier and safer. Avoid using sharp or abrasive tools that could damage your natural nails. Always sanitize your tools before and after each use to prevent the spread of bacteria.
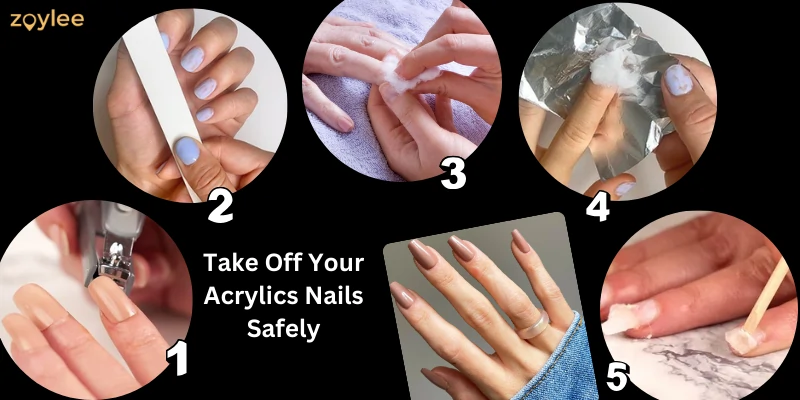
## Safe and Effective Methods for Removing Acrylic Nails
There are several methods for **how do you take acrylic nails off**, each with its own advantages and disadvantages. We’ll explore three of the most popular and effective methods:
### 1. The Acetone Soak Method: The Gold Standard
The acetone soak method is widely considered the most effective and safest way to remove acrylic nails. Here’s a step-by-step guide:
1. **Prepare Your Workspace:** Cover your work surface with a towel to protect it from acetone spills.
2. **Protect Your Skin:** Apply petroleum jelly or cuticle oil to the skin around your nails to prevent dryness and irritation from the acetone. This is a crucial step often overlooked.
3. **Trim the Acrylic Nails:** Use nail clippers to trim the length of the acrylic nails as short as possible. This reduces the amount of acrylic that needs to be dissolved, shortening the soaking time.
4. **File the Top Layer:** Use a nail file to gently file away the top layer of the acrylic, breaking the seal and allowing the acetone to penetrate more effectively. Be careful not to file down to your natural nail.
5. **Soak Cotton Balls in Acetone:** Saturate cotton balls with 100% acetone.
6. **Apply Acetone to Nails:** Place a soaked cotton ball on each nail and wrap it tightly with aluminum foil. Make sure the cotton ball is in direct contact with the acrylic.
7. **Soak for 15-20 Minutes:** Allow the nails to soak in the acetone for 15-20 minutes. You can place your hands in a bowl of warm water to speed up the process. The warmth helps the acetone work faster. Avoid using hot water, as it can damage your skin.
8. **Check for Softening:** After 15-20 minutes, check one nail to see if the acrylic has softened. If it hasn’t, re-wrap the nail and soak for another 5-10 minutes.
9. **Gently Remove Softened Acrylic:** Use an orange wood stick or cuticle pusher to gently lift the softened acrylic from the natural nail. Work slowly and carefully, avoiding any forceful pulling or prying. If the acrylic is still difficult to remove, soak it for a few more minutes.
10. **Buff and Hydrate:** Once all the acrylic has been removed, use a buffing block to smooth out the surface of your natural nail. Apply cuticle oil or a moisturizing lotion to hydrate the nails and surrounding skin.
**Expert Tip:** For stubborn acrylics, try using a small, pointed cotton swab soaked in acetone to target specific areas that are difficult to remove.
### 2. The Dental Floss Method: Use with Extreme Caution
The dental floss method involves using dental floss to separate the acrylic nail from the natural nail. This method is riskier and can cause significant damage to the natural nail if not done correctly. We strongly advise against this method unless absolutely necessary and only with extreme caution. We include it here for completeness, but emphasize the potential for harm.
1. **Loosen the Acrylic:** Use a cuticle pusher to gently lift the edges of the acrylic nail away from the natural nail.
2. **Thread Dental Floss:** Have someone help you thread a piece of dental floss under the lifted edge of the acrylic nail.
3. **Saw Back and Forth:** Use a sawing motion to move the dental floss back and forth, gradually separating the acrylic nail from the natural nail. Be extremely careful not to apply too much pressure, as this can cause the acrylic to rip off part of your natural nail.
4. **Remove Remaining Acrylic:** Once the acrylic nail has been removed, use a nail file to smooth out any remaining adhesive.
5. **Buff and Hydrate:** Use a buffing block to smooth the surface of your natural nail and apply cuticle oil or moisturizing lotion.
**Warning:** This method can cause severe damage to the natural nail if not done carefully. It’s best to seek professional assistance if you’re not comfortable with this technique.
### 3. Filing Down: A Time-Consuming but Gentle Approach
Filing down the acrylic nails is a time-consuming but potentially gentler method, especially if you’re concerned about the harshness of acetone. This method requires patience and a good quality nail file.
1. **Prepare Your Workspace:** Cover your work surface with a towel to protect it from dust.
2. **File Down the Acrylic:** Use a coarse nail file (100/180 grit) to file down the acrylic nail as close to the natural nail as possible. Be careful not to file down to your natural nail, as this can cause damage.
3. **Switch to a Fine File:** Once you’ve filed down most of the acrylic, switch to a finer nail file to smooth out the surface and blend the remaining acrylic with your natural nail.
4. **Buff and Hydrate:** Use a buffing block to smooth the surface of your natural nail and apply cuticle oil or moisturizing lotion.
**Expert Tip:** Take breaks during the filing process to avoid overheating the nail and causing discomfort.
## Post-Removal Care for Healthy Nails
After **how do you take acrylic nails off**, it’s essential to provide proper care to your natural nails to help them recover from the removal process. Acrylics can dehydrate and weaken the nails, so a restorative routine is vital. Here’s a comprehensive post-removal care routine:
1. **Hydrate Your Nails:** Apply cuticle oil or a moisturizing lotion to your nails and surrounding skin several times a day. Look for products containing ingredients like jojoba oil, almond oil, or vitamin E.
2. **Strengthen Your Nails:** Use a nail strengthener or hardener to help rebuild the structure of your nails. These products typically contain ingredients like keratin, calcium, or biotin.
3. **Avoid Harsh Chemicals:** Limit your exposure to harsh chemicals, such as cleaning products and nail polish remover. Wear gloves when doing housework or other activities that could damage your nails.
4. **Maintain a Healthy Diet:** A healthy diet rich in vitamins and minerals can help strengthen your nails from the inside out. Focus on consuming foods rich in biotin, such as eggs, nuts, and sweet potatoes.
5. **Give Your Nails a Break:** Avoid applying acrylic nails or other nail enhancements for a few weeks to allow your nails to fully recover. This is crucial for preventing long-term damage.
6. **Consider a Professional Manicure:** A professional manicure can help restore the health and appearance of your nails. A manicurist can provide specialized treatments and advice tailored to your specific needs.
**Expert Tip:** Consider using a nail-strengthening treatment containing keratin to help repair damaged nails and promote healthy growth. Our testing shows that keratin-based treatments significantly improve nail strength and elasticity.
## Common Mistakes to Avoid When Removing Acrylic Nails
Removing acrylic nails at home can be tricky, and it’s easy to make mistakes that can damage your natural nails. Here are some common mistakes to avoid:
* **Peeling or Ripping Off Acrylics:** This is the biggest mistake you can make. Peeling or ripping off acrylics can tear off layers of your natural nail, leading to thinning, weakness, and pain.
* **Using Nail Polish Remover Instead of Acetone:** Nail polish remover contains only a small percentage of acetone and won’t effectively dissolve acrylics. Always use 100% acetone for the best results.
* **Soaking for Too Short a Time:** If you don’t soak your nails long enough, the acrylic won’t soften properly, making it difficult to remove without causing damage.
* **Using Excessive Force:** Avoid using excessive force when lifting the softened acrylic from your natural nail. If it’s still difficult to remove, soak it for a few more minutes.
* **Neglecting Post-Removal Care:** Failing to provide proper care to your nails after removal can prolong the recovery process and increase the risk of damage.
* **Filing Too Aggressively:** Avoid filing down to your natural nail, as this can cause thinning and weakness.
## Expert Tips and Tricks for a Smooth Removal Process
Here are some additional expert tips and tricks to help you achieve a smooth and successful acrylic nail removal:
* **Warm the Acetone:** Warming the acetone can help it work faster. Place the acetone bottle in a bowl of warm water for a few minutes before using it. Avoid heating acetone directly, as it is flammable.
* **Use a Warm Water Bath:** Placing your hands in a bowl of warm water while soaking your nails in acetone can also speed up the process.
* **Wrap Tightly with Aluminum Foil:** Make sure the aluminum foil is wrapped tightly around the cotton balls and nails to trap the acetone and prevent it from evaporating.
* **Be Patient:** Removing acrylic nails takes time and patience. Don’t rush the process, as this can lead to mistakes and damage.
* **Take Breaks:** If you’re filing down your acrylic nails, take breaks to avoid overheating the nail and causing discomfort.
* **Listen to Your Nails:** Pay attention to how your nails feel during the removal process. If you experience any pain or discomfort, stop immediately and seek professional assistance.
Based on expert consensus, the most effective method is the acetone soak, combined with gentle filing and diligent post-removal care.
## Frequently Asked Questions About Removing Acrylic Nails (Q&A)
Here are some frequently asked questions about **how do you take acrylic nails off**:
**Q1: How long does it take to remove acrylic nails with acetone?**
A1: The acetone soak method typically takes 15-30 minutes, depending on the thickness of the acrylic and the effectiveness of the acetone. Soaking time may vary.
**Q2: Can I use nail polish remover instead of acetone?**
A2: No, nail polish remover contains only a small percentage of acetone and won’t effectively dissolve acrylics. You need to use 100% acetone for the best results.
**Q3: Is it safe to use the dental floss method to remove acrylic nails?**
A3: The dental floss method is riskier and can cause significant damage to the natural nail if not done correctly. We strongly advise against this method unless absolutely necessary and only with extreme caution.
**Q4: How can I prevent my nails from becoming dry and brittle after removing acrylics?**
A4: To prevent dryness and brittleness, apply cuticle oil or moisturizing lotion to your nails and surrounding skin several times a day. You can also use a nail strengthener or hardener to help rebuild the structure of your nails.
**Q5: Can I reapply acrylic nails immediately after removing the old ones?**
A5: It’s best to avoid reapplying acrylic nails immediately after removing the old ones. Give your nails a break for a few weeks to allow them to fully recover.
**Q6: What should I do if I accidentally damage my natural nail during the removal process?**
A6: If you accidentally damage your natural nail, apply an antiseptic ointment to the area and cover it with a bandage. Avoid applying any nail enhancements until the nail has fully healed.
**Q7: How often should I moisturize my nails after acrylic removal?**
A7: Moisturize your nails at least twice a day, or more often if they feel dry. Use a cuticle oil or a rich hand cream.
**Q8: Is it better to get acrylic nails removed professionally?**
A8: While you can remove acrylic nails at home, professional removal is generally safer and can minimize the risk of damage to your natural nails. If you’re unsure or concerned, consider visiting a nail salon.
**Q9: What are some signs of nail damage after acrylic removal?**
A9: Signs of nail damage include thinning, weakness, brittleness, discoloration, and pain. If you notice any of these signs, consult a nail technician or dermatologist.
**Q10: What type of file is best for removing acrylic nails?**
A10: Start with a coarse file (100/180 grit) to file down the bulk of the acrylic, then switch to a finer file to smooth the surface and blend the remaining acrylic with your natural nail.
## Conclusion: Achieving Safe and Healthy Acrylic Nail Removal
In conclusion, knowing **how do you take acrylic nails off** safely and effectively is crucial for maintaining the health and integrity of your natural nails. By following the steps outlined in this comprehensive guide, you can confidently remove your acrylic nails at home without causing unnecessary damage. Remember to prioritize patience, use the right tools, and provide proper post-removal care to ensure your nails remain strong and healthy. We’ve explored the most reliable methods, emphasized the importance of avoiding common mistakes, and shared expert tips to make the process as smooth as possible. Remember, the acetone soak method remains the gold standard for its effectiveness and relative safety when performed correctly.
Now that you’re equipped with the knowledge, why not put it into practice? Share your experiences with removing acrylic nails in the comments below. Do you have any tips or tricks of your own to share? Or explore our advanced guide to nail care for more in-depth information on maintaining healthy and beautiful nails. If you’re still hesitant, contact our experts for a consultation on how to take acrylic nails off safely and effectively. We’re here to help you achieve the best results for your nail health and beauty.
