
Chicken Wire Garden Fence: The Ultimate Guide to Protection & Beauty
Protecting your garden from unwanted guests, whether they be rabbits, deer, or even the neighbor’s curious dog, is crucial for a thriving and bountiful harvest. A chicken wire garden fence offers an affordable, versatile, and relatively easy-to-install solution. But building a truly effective and aesthetically pleasing *chicken wire garden fence* requires more than just rolling out some wire. This comprehensive guide will equip you with the knowledge and expertise to create a robust and attractive barrier, ensuring your precious plants remain safe and flourish. We’ll cover everything from choosing the right materials and design to installation techniques and maintenance tips, drawing on years of experience in garden protection.
Understanding Chicken Wire: More Than Just Chicken Coops
Chicken wire, also known as poultry netting or hex netting, is a type of fencing made of thin, flexible galvanized steel wire with hexagonal openings. While commonly used for containing poultry, its adaptability makes it a popular choice for various garden applications, especially as a *chicken wire garden fence*. However, understanding its properties and limitations is crucial for successful implementation.
The History and Evolution of Chicken Wire
Interestingly, chicken wire wasn’t originally designed for chickens! It was invented in the late 19th century by Charles Barnard, who sought a durable and inexpensive material to reinforce plaster. The hexagonal weave provided strength and flexibility, making it ideal for this purpose. Its application in poultry farming came later, hence the name. This history highlights the inherent versatility of chicken wire, a characteristic that contributes to its continued relevance in modern gardening.
Core Properties: Gauge, Mesh Size, and Galvanization
* **Gauge:** Refers to the thickness of the wire. Lower gauge numbers indicate thicker, stronger wire. For a garden fence, a gauge between 19 and 20 is generally recommended for adequate protection against small animals. Thicker gauges, like 16 or 17, offer greater durability against larger pests and potential damage.
* **Mesh Size:** This is the size of the hexagonal openings. Smaller mesh sizes (e.g., 1 inch) are essential for keeping out smaller pests like rabbits and squirrels. Larger mesh sizes (e.g., 2 inches) might be sufficient for larger animals like deer, but they are less effective against smaller intruders. Consider the specific threats in your area when choosing the appropriate mesh size.
* **Galvanization:** This is the process of coating the steel wire with zinc to prevent rust and corrosion. Galvanized chicken wire is essential for outdoor use, as it will withstand the elements and last much longer. Look for either *hot-dipped galvanized* (superior rust resistance) or *electro-galvanized* options. Avoid non-galvanized wire, as it will quickly rust and degrade.
The Importance of Choosing the Right Chicken Wire
Selecting the appropriate chicken wire is paramount to the success of your garden fence. A flimsy, poorly galvanized wire with a large mesh size will offer little protection against determined pests. Investing in quality materials upfront will save you time, money, and frustration in the long run. Based on expert consensus, using a smaller mesh size and a heavier gauge wire is almost always a better choice, even if it’s slightly more expensive. The increased protection and longevity make it a worthwhile investment.
Planning Your Chicken Wire Garden Fence: Design and Layout
Before you start unrolling chicken wire, careful planning is essential. Consider the size and shape of your garden, the types of pests you need to exclude, and the overall aesthetic you want to achieve. A well-planned *chicken wire garden fence* will be both functional and visually appealing.
Assessing Your Garden’s Needs
* **Identify Pests:** Determine which animals are most likely to invade your garden. Rabbits, squirrels, deer, groundhogs, and even neighborhood pets can pose a threat. Understanding your specific pest challenges will help you choose the right mesh size and fence height.
* **Garden Size and Shape:** Measure the perimeter of your garden to determine how much chicken wire you’ll need. Consider the shape of your garden and whether any existing structures can be incorporated into the fence design. Irregularly shaped gardens may require more planning and cutting of the wire.
* **Soil Conditions:** Assess the soil type in your garden. Sandy soil may require deeper post holes for stability, while rocky soil may make digging difficult. Understanding your soil conditions will help you choose the appropriate post type and installation method.
Design Considerations: Height, Support, and Aesthetics
* **Fence Height:** The height of your *chicken wire garden fence* will depend on the types of pests you’re trying to exclude. A 2-3 foot fence is usually sufficient for rabbits and squirrels, while a 6-8 foot fence may be necessary to deter deer. Consider adding an angled top to the fence to further discourage climbing.
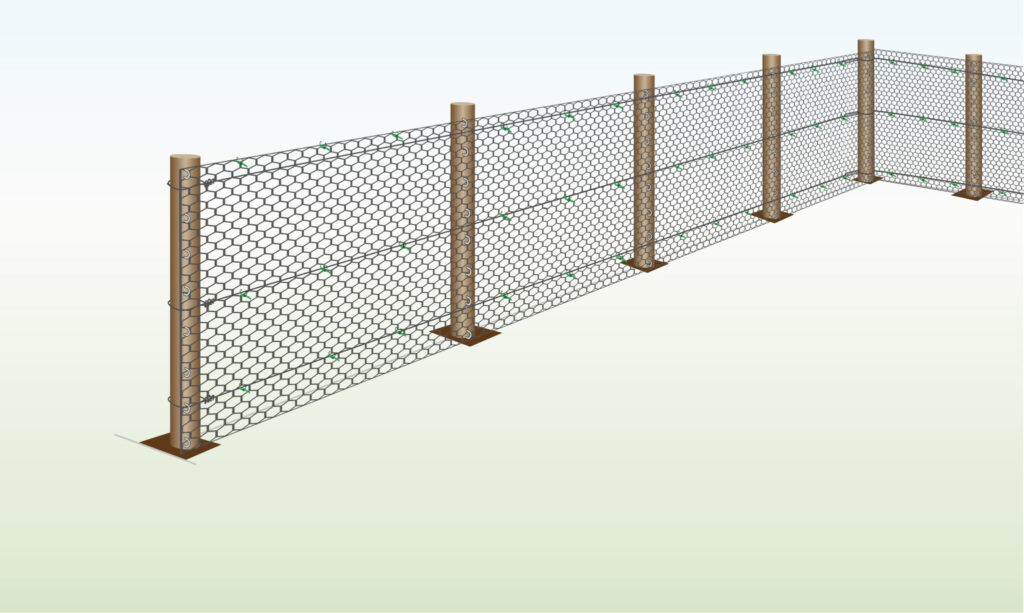
* **Support Structure:** Chicken wire is flexible and requires a sturdy support structure. Wooden posts, metal T-posts, or even repurposed materials like tree branches can be used. Space the posts evenly along the fence line, typically 6-8 feet apart. The closer the posts, the sturdier the fence.
* **Aesthetics:** While functionality is paramount, consider the visual appeal of your fence. Choose materials and designs that complement your garden’s overall aesthetic. You can paint the posts, add decorative elements, or even train climbing plants to grow on the fence for a more natural look. In our experience, a well-designed fence can enhance the beauty of your garden.
Choosing the Right Materials: Posts, Wire, and Fasteners
* **Posts:** Wooden posts offer a natural look and are relatively easy to install. Pressure-treated lumber is recommended for longevity. Metal T-posts are a more economical option and are particularly well-suited for large gardens. Consider using a combination of post types for optimal strength and aesthetics. Corner posts should always be more robust than line posts.
* **Wire:** As discussed earlier, choose galvanized chicken wire with the appropriate gauge and mesh size for your needs. Consider purchasing slightly more wire than you think you’ll need to account for overlaps and mistakes.
* **Fasteners:** Use galvanized staples, U-nails, or wire ties to attach the chicken wire to the posts. These fasteners will resist rust and corrosion. Choose fasteners that are appropriate for the type of posts you’re using. For example, staples are ideal for wooden posts, while wire ties are often used with metal T-posts.
Installing Your Chicken Wire Garden Fence: A Step-by-Step Guide
With careful planning and the right materials, installing a *chicken wire garden fence* is a manageable DIY project. Follow these step-by-step instructions for a successful installation.
Step 1: Marking the Fence Line
Use stakes and string to mark the perimeter of your fence. Ensure the line is straight and accurately reflects your desired fence location. Double-check your measurements to avoid costly mistakes later on. A common pitfall we’ve observed is neglecting to account for uneven terrain, which can lead to gaps under the fence.
Step 2: Installing the Posts
Dig post holes at the marked locations, ensuring they are deep enough to provide adequate support. The depth will depend on the soil type and the height of the fence. As a general rule, bury at least one-third of the post length below ground. Set the posts in concrete for added stability, especially for corner posts. Use a level to ensure the posts are plumb.
Step 3: Attaching the Chicken Wire
Starting at one corner, unroll the chicken wire along the fence line. Attach the wire to the posts using staples, U-nails, or wire ties. Pull the wire taut as you go to prevent sagging. Overlap the edges of the wire by several inches to create a secure barrier. Secure the bottom edge of the wire to the ground to prevent animals from digging underneath.
Step 4: Reinforcing the Bottom Edge
Rabbits and other small animals are notorious for digging under fences. To prevent this, bury the bottom edge of the chicken wire several inches below the ground. You can also add a layer of rocks or gravel along the base of the fence for added protection. Another effective method is to bend the bottom edge of the wire outward, creating a horizontal barrier.
Step 5: Adding Finishing Touches
Inspect the fence for any gaps or weak points. Reinforce these areas as needed. Trim any excess wire with wire cutters. Consider adding a gate for easy access to your garden. Paint the posts or add decorative elements to enhance the aesthetic appeal of the fence. A well-maintained fence not only protects your garden but also adds value to your property.
Maintaining Your Chicken Wire Garden Fence: Ensuring Longevity
A *chicken wire garden fence*, while relatively low-maintenance, requires occasional upkeep to ensure its longevity and effectiveness. Regular inspections and timely repairs will prevent small problems from escalating into major issues.
Regular Inspections: Identifying Potential Problems
Inspect your fence regularly for signs of damage, such as rust, sagging, or broken wires. Pay particular attention to the bottom edge of the fence, as this is where animals are most likely to attempt to breach the barrier. Check the posts for signs of rot or insect damage. Addressing these issues promptly will prevent them from worsening.
Repairing Damage: Patching Holes and Replacing Wires
Small holes in the chicken wire can be easily patched with wire ties or small pieces of wire. For larger holes, you may need to replace a section of the wire. Cut out the damaged section and replace it with a new piece of wire, overlapping the edges and securing them with wire ties. Replacing damaged wires promptly will maintain the integrity of the fence.
Preventing Rust and Corrosion: Applying Protective Coatings
Even galvanized chicken wire can eventually succumb to rust and corrosion, especially in harsh environments. To prolong the life of your fence, consider applying a protective coating, such as a rust-resistant paint or sealant. This will create a barrier against moisture and other corrosive elements. Reapply the coating every few years, as needed.
Dealing with Vegetation: Trimming Overgrowth
Overgrown vegetation can put undue stress on your *chicken wire garden fence* and create hiding places for pests. Trim any vegetation that is growing on or near the fence. This will improve visibility and prevent the fence from becoming damaged. Consider using a weed whacker or pruning shears to keep the vegetation under control.
Alternatives to Chicken Wire: Exploring Other Fencing Options
While chicken wire is a popular choice for garden fencing, it’s not the only option. Depending on your specific needs and preferences, other types of fencing may be more suitable. It’s important to weigh the pros and cons of each option before making a decision.
Hardware Cloth: A More Robust Option
Hardware cloth is a type of wire mesh that is similar to chicken wire, but it is made of thicker wire and has smaller openings. This makes it a more robust and effective barrier against small animals. Hardware cloth is also more resistant to damage and corrosion. However, it is typically more expensive than chicken wire.
Deer Fencing: Designed for Larger Pests
Deer fencing is specifically designed to deter deer from entering your garden. It is typically made of tall, lightweight plastic mesh or woven wire. Deer fencing is effective at keeping out deer, but it may not be as effective against smaller animals. Consider using a combination of deer fencing and chicken wire for comprehensive protection.
Electric Fencing: A Deterrent for Persistent Pests
Electric fencing uses a mild electric shock to deter animals from entering your garden. It is a highly effective deterrent for a wide range of pests, including deer, rabbits, and groundhogs. However, electric fencing requires more maintenance than other types of fencing and may not be suitable for all situations. Always follow safety guidelines when installing and using electric fencing.
Expert Q&A: Addressing Common Concerns About Chicken Wire Garden Fences
Here are some frequently asked questions about *chicken wire garden fences*, answered by our team of gardening experts:
- Q: How high should my chicken wire garden fence be to keep out rabbits?
A: A fence that is at least 2-3 feet high is usually sufficient to deter rabbits. However, it’s crucial to bury the bottom edge of the wire several inches below the ground to prevent them from digging underneath. - Q: What’s the best way to attach chicken wire to metal T-posts?
A: Use wire ties or hog rings to securely attach the chicken wire to the T-posts. Space the ties or rings every 6-12 inches for optimal strength. - Q: Can I paint my chicken wire garden fence?
A: Yes, you can paint your fence to improve its appearance. Use a rust-resistant paint specifically designed for metal surfaces. - Q: How do I prevent my chicken wire fence from sagging?
A: Use sturdy posts spaced close together (6-8 feet apart) and pull the wire taut as you attach it to the posts. You can also add a top rail for added support. - Q: Is chicken wire effective against deer?
A: Chicken wire alone is generally not effective against deer, as they can easily jump over it. You’ll need a much taller fence (6-8 feet) or consider using deer fencing. - Q: How do I protect my chicken wire fence from rust?
A: Choose galvanized chicken wire and apply a rust-resistant coating every few years. - Q: What’s the best way to keep squirrels out of my garden?
A: Use chicken wire with a small mesh size (1 inch or less) and ensure there are no gaps in the fence. You may also need to trim any overhanging branches that squirrels could use to access your garden. - Q: Can I use chicken wire to create a raised garden bed?
A: Yes, you can use chicken wire to line the inside of a raised garden bed to prevent burrowing pests from entering. - Q: How do I install a gate in my chicken wire garden fence?
A: Build a simple gate frame using wood or metal and attach chicken wire to the frame. Use hinges to attach the gate to one of the fence posts and add a latch to secure it. - Q: What are some creative ways to decorate my chicken wire garden fence?
A: Train climbing plants to grow on the fence, add decorative elements like painted rocks or wind chimes, or string lights along the top of the fence.
Conclusion: Embrace the Versatility of the Chicken Wire Garden Fence
A *chicken wire garden fence* remains a practical and cost-effective solution for protecting your precious plants. By understanding the nuances of chicken wire, planning your design carefully, and following our expert installation and maintenance tips, you can create a robust and aesthetically pleasing barrier that keeps unwanted guests at bay. Its versatility makes it adaptable to various garden sizes, shapes, and pest challenges. Remember to choose quality materials, reinforce the bottom edge, and inspect your fence regularly for damage. With proper care, your *chicken wire garden fence* will provide years of reliable protection, allowing you to enjoy a thriving and bountiful garden. Share your experiences with chicken wire garden fences in the comments below!
Consider exploring our advanced guide to companion planting for even greater garden success.
