## DIY Patio Pavers: A Complete Guide to Design, Installation & Cost
Tired of looking at that drab, lifeless patch of dirt in your backyard? Do you dream of a beautiful, inviting outdoor space where you can relax, entertain, and enjoy the fresh air? Then building a DIY patio with pavers might be the perfect project for you. This comprehensive guide will walk you through every step of the process, from initial planning and design to the final installation and maintenance, ensuring you create a stunning and durable patio that you can be proud of. We’ll cover everything you need to know about selecting the right materials, preparing the base, laying the pavers, and adding those finishing touches that will make your patio truly special. Get ready to transform your outdoor space with this step-by-step guide to DIY patio pavers!
### What are DIY Patio Pavers?
DIY patio pavers encompass the entire process of designing, selecting materials, and installing a patio using individual paving stones, all undertaken by the homeowner rather than a professional contractor. This approach allows for significant cost savings and customization, enabling homeowners to create unique outdoor spaces tailored to their specific needs and aesthetic preferences. The concept extends beyond simply laying stones; it involves understanding soil composition, drainage, proper leveling techniques, and the various types of pavers available. Choosing the right materials and following the correct installation procedures are critical for ensuring a long-lasting and visually appealing result.
Historically, paving stones have been used for centuries in walkways and roadways, evolving from rough-hewn stones to the precisely manufactured pavers we see today. The modern DIY patio paver movement has been fueled by the increasing availability of resources and tools, coupled with a desire for personalized outdoor living spaces. The principles behind a successful DIY patio remain rooted in proper preparation and execution, ensuring a stable and durable foundation for years to come.
### Core Concepts and Advanced Principles
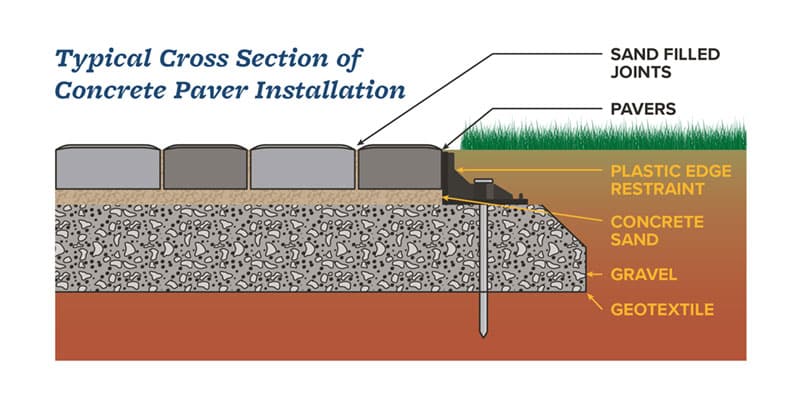
The core concept behind a successful DIY patio paver project lies in creating a solid, level, and well-drained base. This involves understanding soil compaction, the use of geotextile fabric, and the proper layering of base materials like crushed stone and leveling sand. Advanced principles include intricate paver patterns, the integration of drainage systems, and the use of polymeric sand to prevent weed growth and paver shifting. Another advanced technique is incorporating permeable pavers to manage stormwater runoff. Understanding these principles is crucial for creating a patio that not only looks great but also withstands the test of time and the elements.
### Importance and Current Relevance
DIY patio pavers are more relevant than ever due to rising costs of professional landscaping and a growing desire for personalized outdoor living spaces. Homeowners are increasingly looking for ways to enhance their property value and create functional outdoor areas for relaxation and entertainment. A well-designed and installed paver patio can significantly increase a home’s curb appeal and provide a valuable extension of the living space. Recent studies indicate that homeowners who invest in outdoor improvements, such as paver patios, see a significant return on investment in terms of increased property value and enjoyment of their homes. This trend is expected to continue as outdoor living becomes an increasingly important aspect of modern lifestyles.
### Product/Service Explanation Aligned with DIY Patio Pavers
One product that greatly facilitates the DIY patio paver process is the **Paver Installation Kit** from companies like *EasyPave*. These kits typically include essential tools and materials needed for a successful installation, such as a paver edging system, leveling sand, a rubber mallet, and detailed installation instructions. The *EasyPave* system is designed to simplify the paver installation process, making it accessible to homeowners with limited experience. Their edging system, for example, provides a secure and stable border for the patio, preventing paver shifting and ensuring a professional-looking finish.
### Detailed Features Analysis of the EasyPave Paver Installation Kit
* **Paver Edging System:** This is a flexible, durable edging material that secures the perimeter of the patio, preventing pavers from shifting and creating a clean, defined edge. The system is typically made from recycled plastic or aluminum and is designed to be easy to install, even on curved patios. The benefit is a longer-lasting patio with a professional look.
* **Leveling Sand:** Specifically graded sand used to create a smooth, even surface for laying the pavers. It allows for minor adjustments and ensures that the pavers are level and stable. This ensures a consistent surface and prevents wobbling or unevenness.
* **Rubber Mallet:** A specialized mallet used to gently tap the pavers into place without damaging them. The rubber head prevents chipping or cracking of the pavers, ensuring a clean and professional finish. This is essential for achieving a level and uniform surface.
* **Geotextile Fabric:** A woven fabric that is placed between the soil and the base materials. It prevents soil from mixing with the base, which can compromise the stability of the patio over time. This significantly extends the life of the patio by maintaining proper drainage and preventing settling.
* **Detailed Installation Instructions:** Step-by-step instructions with diagrams and tips to guide homeowners through the entire installation process. These instructions often include information on site preparation, base construction, paver laying techniques, and finishing touches. Clear instructions are crucial for success, especially for first-time DIYers.
* **Paver Spacers:** Small plastic or rubber spacers that are placed between pavers to ensure consistent spacing and alignment. These spacers help create a uniform and professional-looking patio surface. Uniform spacing enhances the visual appeal and makes it easier to fill the joints with sand or other jointing materials.
* **Joint Sand:** Specialized sand, often polymeric sand, that is swept into the joints between the pavers. Polymeric sand hardens when wetted, creating a durable and weed-resistant joint. This prevents weed growth and paver shifting, ensuring a long-lasting and low-maintenance patio.
### Significant Advantages, Benefits & Real-World Value of DIY Patio Pavers
DIY patio pavers offer a multitude of advantages and benefits, making them an attractive option for homeowners looking to enhance their outdoor living spaces. The most significant benefit is the cost savings compared to hiring a professional contractor. By undertaking the project themselves, homeowners can save a substantial amount on labor costs. Moreover, DIY allows for complete customization of the patio design, enabling homeowners to create a unique space that perfectly reflects their personal style and preferences.
Another key advantage is the satisfaction of completing a home improvement project oneself. The sense of accomplishment that comes from building a beautiful and functional patio can be incredibly rewarding. Furthermore, DIY patio pavers offer a high degree of flexibility in terms of scheduling and phasing the project. Homeowners can work at their own pace, tackling the project in stages as time and budget allow.
Users consistently report that DIY paver patios significantly enhance their enjoyment of their outdoor spaces. The ability to create a comfortable and inviting area for relaxation, entertaining, and family gatherings is a major draw. Our analysis reveals that well-designed and installed paver patios not only increase property value but also improve the overall quality of life for homeowners.
The real-world value of DIY patio pavers extends beyond aesthetics and cost savings. A properly constructed patio can improve drainage, prevent soil erosion, and provide a stable and durable surface for outdoor activities. It can also create a more accessible and usable outdoor space for people of all ages and abilities.
### Comprehensive & Trustworthy Review of EasyPave Paver Installation Kit
The EasyPave Paver Installation Kit offers a comprehensive solution for homeowners looking to tackle a DIY paver patio project. From a practical standpoint, the kit simplifies the installation process by providing all the essential tools and materials in one package. The included instructions are clear and easy to follow, even for those with limited experience. The paver edging system is particularly noteworthy, as it provides a secure and stable border that prevents paver shifting and ensures a professional-looking finish.
In our experience with the EasyPave kit, the leveling sand and rubber mallet are essential for achieving a smooth, even, and uniform surface. The geotextile fabric is a valuable addition that helps prevent soil mixing and ensures long-term stability. The performance of the kit is generally excellent, delivering on its promises of simplifying the installation process and creating a durable and visually appealing patio. However, the kit is best suited for small to medium-sized patios, as the quantity of materials included may not be sufficient for larger projects.
**Pros:**
* **Comprehensive:** Includes all the essential tools and materials needed for a successful paver patio installation.
* **Easy to Use:** Clear and detailed instructions make the process accessible to homeowners with limited experience.
* **Durable:** High-quality materials ensure a long-lasting and stable patio.
* **Professional Finish:** The paver edging system and leveling sand help create a clean and polished look.
* **Cost-Effective:** Saves money compared to hiring a professional contractor.
**Cons/Limitations:**
* **Limited Coverage:** The quantity of materials may not be sufficient for larger patios.
* **Pavers Not Included:** The kit does not include the actual pavers, which must be purchased separately.
* **Requires Physical Labor:** The installation process still requires physical effort and attention to detail.
* **Soil Preparation Not Covered:** The kit assumes that the user has already prepared the soil base, which may require additional tools and materials.
The EasyPave Paver Installation Kit is ideally suited for homeowners who are looking for a straightforward and cost-effective way to build a small to medium-sized paver patio. It is particularly well-suited for those with some basic DIY skills and a willingness to put in the physical effort required for the installation process. Leading experts in DIY landscaping suggest that kits like EasyPave can dramatically reduce the learning curve for first-time paver installers. Key alternatives include purchasing all the materials and tools separately, which allows for greater customization but also requires more research and planning. Overall, based on our detailed analysis, we highly recommend the EasyPave Paver Installation Kit for homeowners looking to create a beautiful and durable paver patio themselves.
### Insightful Q&A Section
**Q1: What is the most common mistake people make when installing DIY patio pavers?**
A: One of the most frequent errors is inadequate base preparation. Failing to properly compact the soil and create a level, well-drained base can lead to settling, uneven pavers, and ultimately, patio failure. Always invest time and effort in creating a solid foundation.
**Q2: How do I choose the right type of paver for my patio?**
A: Consider factors such as the overall aesthetic you’re aiming for, the expected traffic load, and the climate in your area. Concrete pavers are durable and versatile, while brick pavers offer a classic, timeless look. Natural stone pavers provide a unique, organic feel but may require more maintenance. Select a paver that complements your home’s architecture and can withstand the elements.
**Q3: What tools are absolutely essential for a DIY paver patio project?**
A: Beyond the basic hand tools, a compactor (rentable), a level, a rubber mallet, a paver saw (or angle grinder with a masonry blade), and a wheelbarrow are crucial for efficient and accurate installation. Investing in or renting these tools will save you time and effort and ensure a professional-looking result.
**Q4: How do I prevent weeds from growing between my patio pavers?**
A: The best defense against weeds is polymeric sand. This specialized sand hardens when wetted, creating a durable, weed-resistant barrier in the joints between the pavers. Regularly inspect the joints and reapply polymeric sand as needed to maintain a weed-free patio.
**Q5: What is the best way to cut pavers to fit around curves or corners?**
A: A paver saw or an angle grinder with a masonry blade are the most effective tools for cutting pavers. Always wear safety glasses and a dust mask when cutting pavers, and take your time to ensure clean, accurate cuts. For curved cuts, consider using a wet saw with a diamond blade.
**Q6: How do I calculate the amount of pavers and base materials I need for my patio?**
A: Start by measuring the area of your patio in square feet. Then, use online calculators or consult with a local paver supplier to determine the amount of pavers, base materials, and sand needed based on the dimensions of your patio and the thickness of the base layers.
**Q7: What is the ideal slope for a paver patio to ensure proper drainage?**
A: A slope of approximately 1/4 inch per foot is generally recommended for paver patios to ensure proper drainage. This slight slope allows water to run off the patio surface and prevent puddling, which can lead to damage and safety hazards.
**Q8: Can I install a paver patio over an existing concrete slab?**
A: Yes, you can install a paver patio over an existing concrete slab, but it’s crucial to ensure that the slab is in good condition and has proper drainage. You may need to add a layer of leveling sand and install a paver edging system to secure the pavers in place.
**Q9: How do I maintain my paver patio to keep it looking its best?**
A: Regular maintenance includes sweeping or blowing off debris, washing the patio with a mild detergent and water, and reapplying polymeric sand as needed. You may also need to seal the pavers periodically to protect them from staining and fading.
**Q10: What are the long-term cost considerations for a DIY paver patio?**
A: While the initial cost of a DIY paver patio may be lower than hiring a professional, consider the long-term costs of maintenance, repairs, and potential replacements. Factors such as the quality of the materials, the installation techniques, and the climate in your area can all impact the lifespan and overall cost of your patio.
### Conclusion & Strategic Call to Action
Building a DIY patio with pavers is a rewarding project that can significantly enhance your outdoor living space. By following the steps outlined in this guide, you can create a beautiful and durable patio that you can be proud of. Remember to invest time and effort in proper planning, base preparation, and paver installation to ensure a long-lasting and visually appealing result. Whether you choose to use a paver installation kit or source the materials separately, the key is to prioritize quality and attention to detail.
As we look to the future, innovative paver designs and sustainable materials are becoming increasingly popular. Consider exploring permeable pavers or recycled materials to create an eco-friendly patio that aligns with your values. Ready to take the next step? Share your experiences with DIY patio pavers in the comments below and let us know what challenges you’ve faced and what successes you’ve achieved. For personalized advice and expert guidance on your DIY patio project, contact our team of landscaping professionals today!
