Achieve Salon-Quality Acrylic Nails at Home: Your Expert Guide
Dreaming of perfectly sculpted acrylic nails but dreading the salon prices and time commitment? You’re not alone! Achieving stunning at home acrylic nails is entirely possible with the right knowledge, tools, and techniques. This comprehensive guide will walk you through every step, from understanding the basics to mastering advanced application methods. We’ll cover product selection, safety precautions, troubleshooting common issues, and provide expert tips to ensure a flawless, long-lasting manicure. This isn’t just another DIY nail tutorial; it’s your path to becoming an at-home acrylic nail pro.
Understanding the Fundamentals of At Home Acrylic Nails
Before diving into the application process, it’s crucial to understand the underlying principles of acrylic nails. Acrylic nails are essentially a combination of a liquid monomer and a powder polymer that create a hard, durable layer over your natural nails. This layer can be sculpted to add length, shape, and strength. Unlike gel nails, acrylics air dry and don’t require curing under a UV or LED lamp.
A Brief History and Evolution
The concept of artificial nails dates back centuries, but the modern acrylic nail emerged in the 1950s. Initially, they were primarily used by celebrities and in the film industry. Over time, advancements in materials and techniques have made acrylic nails more accessible and popular among the general public. Today, at home acrylic nails are a thriving trend, driven by cost-effectiveness, convenience, and the desire for personalized nail art.
Core Components: Monomer and Polymer
The foundation of acrylic nails lies in the chemical reaction between the liquid monomer and the powder polymer. The monomer, typically ethyl methacrylate (EMA), acts as a solvent, while the polymer, usually polymethyl methacrylate (PMMA), provides the structure. When combined, they form a pliable mixture that can be molded and shaped before hardening.
Safety First: Essential Precautions
Working with acrylics involves chemicals, so safety should be your top priority. Always work in a well-ventilated area to avoid inhaling fumes. Wear a dust mask to prevent inhaling acrylic dust during filing and shaping. Avoid contact with skin and eyes. If contact occurs, rinse immediately with plenty of water. Proper ventilation is especially important for those with respiratory sensitivities. Furthermore, it’s essential to avoid using methyl methacrylate (MMA) monomers, as they are known to cause severe allergic reactions and nail damage.
Choosing the Right Products for Your At Home Acrylic Nails
Selecting high-quality products is paramount for achieving professional-looking at home acrylic nails. Skimping on materials can lead to poor adhesion, lifting, discoloration, and even nail damage. Here’s a breakdown of essential items:
- Acrylic Powder: Available in various colors and finishes (clear, white, pink, glitter). Choose a powder that is finely milled and easy to work with.
- Acrylic Liquid Monomer: Opt for an EMA-based monomer with a low odor. Avoid MMA monomers at all costs.
- Acrylic Nail Brush: A high-quality brush is essential for picking up the right amount of product and applying it smoothly. Look for a brush made of kolinsky sable hair.
- Nail Forms or Tips: Nail forms are used to sculpt extensions, while tips are pre-shaped extensions that are glued onto the natural nail.
- Nail Primer: This helps to dehydrate the nail and improve adhesion.
- Nail Dehydrator: Removes excess oil from the nail surface.
- Cuticle Pusher and Nipper: For prepping the natural nails.
- Nail Files and Buffers: For shaping and smoothing the acrylics.
- Top Coat: To seal and protect the acrylics.
Leading Brands and Product Recommendations
Several reputable brands offer high-quality acrylic nail products. Some popular choices include:
- CND: Known for their high-quality monomers and powders.
- OPI: Offers a wide range of acrylic products in various colors and finishes.
- Young Nails: A favorite among nail professionals for their excellent workability and durability.
- Mia Secret: A more affordable option that still delivers good results.
Step-by-Step Guide: Applying Acrylic Nails at Home
Applying at home acrylic nails requires patience, practice, and attention to detail. Follow these steps carefully to achieve a flawless finish:
- Prepare Your Nails: Sanitize your hands. Push back your cuticles and remove any dead skin. Gently buff the surface of your natural nails to remove shine. Apply nail dehydrator and primer.
- Apply Nail Forms or Tips: If using nail forms, attach them securely to your natural nails, ensuring a snug fit. If using tips, glue them on and trim them to the desired length and shape.
- Mix the Acrylic: Pour a small amount of monomer into a dappen dish. Dip your acrylic brush into the monomer, then gently tap it into the acrylic powder to pick up a bead. The bead should be moist but not runny.
- Apply the Acrylic: Place the bead of acrylic onto your nail and gently pat it into place. Work quickly, as the acrylic will start to harden. Build up the desired shape and thickness in thin layers.
- Shape and File: Once the acrylic is completely dry, use a nail file to shape the nails to your desired form. Use a buffer to smooth out any imperfections.
- Apply Top Coat: Apply a thin layer of top coat to seal and protect the acrylics. Cure under a UV or LED lamp if using a gel top coat.
- Clean Up: Remove any dust or debris with a lint-free wipe and acetone.
Mastering the Acrylic Nail Brush: The Key to Smooth Application
The acrylic nail brush is your most important tool when creating at home acrylic nails. Mastering its use is crucial for achieving a smooth, even application. Here’s a breakdown of key techniques:
- Choosing the Right Brush: A kolinsky sable brush in size 8 or 10 is ideal for most applications.
- Loading the Brush: Dip the brush into the monomer at a 45-degree angle, then gently tap it into the acrylic powder. The goal is to create a small, moist bead of acrylic.
- Applying the Acrylic: Use the belly of the brush to pat the acrylic onto the nail. Avoid pressing too hard, as this can create air bubbles.
- Cleaning the Brush: Clean your brush after each bead of acrylic to prevent it from hardening. Use a lint-free wipe and acetone.
Troubleshooting Common Issues with At Home Acrylic Nails
Even with careful application, you may encounter some common issues when doing at home acrylic nails. Here’s how to troubleshoot them:
- Lifting: This occurs when the acrylic separates from the natural nail. It’s often caused by improper nail preparation or using low-quality products. Ensure you properly dehydrate and prime your nails before applying acrylic.
- Bubbles: Air bubbles can form in the acrylic if you mix the monomer and powder too vigorously or if you don’t apply the acrylic smoothly. Avoid over-mixing and use a gentle patting motion when applying the acrylic.
- Yellowing: Acrylics can yellow over time due to exposure to sunlight or certain chemicals. Use a UV-resistant top coat to prevent yellowing.
- Cracking: Cracking can occur if the acrylic is too thin or if it’s subjected to excessive stress. Build up the acrylic in thin layers to ensure adequate thickness.
Advantages of Doing Your Own Acrylic Nails
Opting for at home acrylic nails offers several compelling advantages over salon visits, contributing to its growing popularity:
Cost Savings
The most significant advantage is the cost savings. A single salon visit for acrylic nails can easily cost $50 or more. With a one-time investment in supplies, you can do your own acrylic nails for a fraction of the price.
Convenience and Time Savings
Doing your own acrylic nails allows you to avoid the hassle of scheduling appointments and traveling to the salon. You can do them in the comfort of your own home, at your own pace.
Customization and Creativity
With at home acrylic nails, you have complete control over the design, shape, and color. You can experiment with different styles and create unique looks that reflect your personal taste.
Flexibility and Maintenance
You can easily touch up or repair your acrylic nails at home, without having to wait for a salon appointment. This is particularly useful for fixing minor chips or cracks.
Disadvantages and Potential Risks of At Home Acrylic Nails
While at home acrylic nails offer numerous benefits, it’s crucial to acknowledge the potential drawbacks and risks involved:
Learning Curve and Skill Required
Applying acrylic nails requires practice and skill. It may take several attempts to achieve a professional-looking result. Be prepared to invest time and effort in learning the proper techniques.
Potential for Nail Damage
Improper application or removal of acrylic nails can damage your natural nails. Avoid picking or peeling off the acrylics, as this can weaken the nail plate. Always use proper removal techniques.
Exposure to Chemicals
Working with acrylics involves exposure to chemicals, which can cause allergic reactions or skin irritation in some individuals. Always work in a well-ventilated area and wear gloves to protect your skin.
Time Commitment
Applying acrylic nails can be time-consuming, especially when you’re first starting out. Set aside ample time to complete the process without feeling rushed.
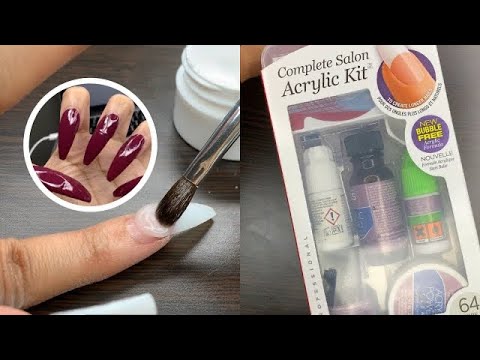
In-Depth Review of Mia Secret Acrylic System
For those looking for an affordable and reliable system to create at home acrylic nails, the Mia Secret Acrylic System is a popular choice. It provides a great balance between quality and price, making it ideal for beginners and experienced users alike.
User Experience and Usability
The Mia Secret Acrylic System is relatively easy to use, even for beginners. The acrylic powder is finely milled and blends smoothly with the monomer. The system provides ample working time, allowing for precise sculpting and shaping. However, the monomer has a strong odor, so proper ventilation is essential.
Performance and Effectiveness
The Mia Secret Acrylic System delivers durable and long-lasting results. The acrylics are resistant to chipping and cracking, and they maintain their color and shine for several weeks. The adhesion is excellent, minimizing the risk of lifting.
Pros
- Affordable Price: The Mia Secret Acrylic System is one of the most affordable options on the market.
- Easy to Use: The system is user-friendly, even for beginners.
- Durable and Long-Lasting: The acrylics are resistant to chipping and cracking.
- Excellent Adhesion: The system provides strong adhesion, minimizing the risk of lifting.
- Wide Range of Colors: Mia Secret offers a wide range of acrylic powders in various colors and finishes.
Cons/Limitations
- Strong Odor: The monomer has a strong odor, requiring proper ventilation.
- Not as High-End as Professional Brands: While good, the quality isn’t quite on par with brands like CND or OPI.
- Can Be Difficult to Remove: Removal can be challenging and may require professional assistance.
- Requires Careful Application: Improper application can lead to lifting or cracking.
Ideal User Profile
The Mia Secret Acrylic System is best suited for individuals who are looking for an affordable and reliable way to do their own at home acrylic nails. It’s a great option for beginners who are just starting out, as well as experienced users who want a budget-friendly alternative to professional brands.
Key Alternatives
Two main alternatives to the Mia Secret Acrylic System are:
- CND Acrylic System: A professional-grade system known for its superior quality and performance. However, it’s significantly more expensive.
- OPI Acrylic System: Another high-quality system that offers a wide range of colors and finishes. It’s also more expensive than the Mia Secret system.
Expert Overall Verdict & Recommendation
Overall, the Mia Secret Acrylic System is a solid choice for those seeking an affordable and reliable system for at home acrylic nails. While it may not be as high-end as professional brands, it delivers excellent results for the price. We recommend it for beginners and experienced users alike who are looking for a budget-friendly option. However, be sure to work in a well-ventilated area due to the strong odor of the monomer.
Q&A: Expert Answers to Your Acrylic Nail Questions
Here are some frequently asked questions about at home acrylic nails, along with expert answers:
-
Q: How can I prevent my acrylic nails from lifting?
A: Proper nail preparation is key. Thoroughly dehydrate and prime your nails before applying acrylic. Use high-quality products and avoid getting the acrylic on your cuticles.
-
Q: What’s the best way to remove acrylic nails without damaging my natural nails?
A: Soak your nails in acetone for 20-30 minutes, or until the acrylic softens. Gently scrape off the softened acrylic with a cuticle pusher. Avoid picking or peeling off the acrylic, as this can damage your natural nails.
-
Q: How often should I get my acrylic nails filled?
A: Typically, you should get your acrylic nails filled every 2-3 weeks, depending on how quickly your nails grow.
-
Q: Can I use regular nail polish on acrylic nails?
A: Yes, you can use regular nail polish on acrylic nails. However, be sure to use a base coat to prevent staining.
-
Q: How can I make my acrylic nails stronger and more durable?
A: Build up the acrylic in thin layers to ensure adequate thickness. Use a high-quality acrylic powder and monomer, and avoid exposing your nails to harsh chemicals.
-
Q: What are the signs of a fungal infection under acrylic nails?
A: Signs of a fungal infection include discoloration, thickening, and separation of the nail from the nail bed. If you suspect a fungal infection, remove the acrylic nails immediately and consult a doctor.
-
Q: How can I prevent my acrylic brush from hardening?
A: Clean your brush after each bead of acrylic with a lint-free wipe and acetone. Store your brush in a brush holder with the bristles pointing down.
-
Q: What’s the difference between acrylic and gel nails?
A: Acrylic nails are made from a powder and liquid mixture that air dries, while gel nails are made from a gel that is cured under a UV or LED lamp. Acrylic nails are generally stronger and more durable than gel nails.
-
Q: Can I do acrylic nails if I have sensitive skin?
A: If you have sensitive skin, you may be more prone to allergic reactions from the chemicals in acrylics. Choose hypoallergenic products and wear gloves to protect your skin.
-
Q: How can I create different nail shapes with acrylics?
A: You can create various nail shapes with acrylics, such as square, oval, almond, and stiletto. Use nail forms or tips to guide the shaping process, and file the acrylic to your desired form.
Conclusion: Your Journey to Stunning At Home Acrylic Nails
Mastering the art of at home acrylic nails is a rewarding journey that empowers you to achieve salon-quality results without the hefty price tag or time constraints. By understanding the fundamentals, choosing the right products, and following our step-by-step guide, you can create stunning, personalized manicures that reflect your unique style. Remember to prioritize safety, practice patience, and don’t be afraid to experiment. Our collective experience suggests that with dedication and the right techniques, anyone can achieve flawless acrylic nails at home. Now, share your experiences with at home acrylic nails in the comments below!
