Making a Brick Patio: The Ultimate Guide to Design, Build, and Enjoy
Dreaming of a charming outdoor space where you can relax, entertain, and enjoy the beauty of your garden? Making a brick patio is a fantastic way to add value, beauty, and functionality to your home. This comprehensive guide will walk you through every step of the process, from initial design and planning to final installation and maintenance. We’ll cover everything you need to know to create a stunning and durable brick patio that will last for years to come. Whether you’re a seasoned DIY enthusiast or a complete beginner, this guide is designed to provide you with the expert knowledge and practical skills you need to succeed.
Why Choose a Brick Patio? The Enduring Appeal and Benefits
Brick patios have been a popular choice for centuries, and for good reason. They offer a unique combination of beauty, durability, and versatility that few other materials can match. Here’s a closer look at the key advantages of making a brick patio:
- Aesthetic Appeal: Brick offers a timeless, classic look that complements a wide range of architectural styles. The natural variations in color and texture create a warm and inviting atmosphere.
- Durability: Brick is incredibly strong and resistant to weathering, making it an ideal choice for outdoor use. A well-constructed brick patio can last for decades with proper maintenance.
- Versatility: Brick can be laid in a variety of patterns, allowing you to create a unique and personalized design. It can also be easily cut and shaped to fit any space.
- Low Maintenance: Once installed, a brick patio requires very little maintenance. Regular sweeping and occasional cleaning are usually all that’s needed to keep it looking its best.
- Increased Home Value: A well-designed and professionally installed brick patio can significantly increase the value of your home. It’s an investment that you can enjoy for years to come.
Planning Your Brick Patio: Design, Layout, and Materials
Before you start digging, it’s crucial to carefully plan your brick patio. This will ensure that you end up with a result that meets your needs and exceeds your expectations. Here are some key considerations:
1. Determining the Size and Shape
The size of your patio will depend on how you plan to use it. Consider the number of people you want to accommodate, the furniture you want to include, and the amount of space you have available. The shape of your patio should complement your home and garden. Common shapes include rectangles, squares, circles, and free-form designs.
2. Choosing the Right Brick
There are many different types of brick to choose from, each with its own unique characteristics. Some popular options include:
- Clay Brick: The most common type of brick, made from fired clay. It’s durable, affordable, and available in a wide range of colors and textures.
- Concrete Brick: Made from concrete, these bricks are often more affordable than clay brick and can be manufactured in a variety of shapes and sizes.
- Paver Brick: Specifically designed for paving, these bricks are typically thicker and more durable than standard bricks.
Consider the color, texture, and size of the brick when making your selection. Also, ensure that the brick is suitable for outdoor use and can withstand the climate in your area.
3. Selecting a Laying Pattern
The laying pattern can have a significant impact on the overall look of your patio. Some popular patterns include:
- Running Bond: A simple and classic pattern where each brick is offset by half its length.
- Herringbone: A more complex pattern that creates a visually appealing zigzag effect.
- Basket Weave: A pattern that alternates pairs of bricks laid horizontally and vertically.
- Circular: Bricks are laid in a circular pattern around a central point.
Choose a pattern that complements your overall design and skill level. More complex patterns may require more time and effort to install.
4. Creating a Detailed Plan
Once you’ve made your key decisions, create a detailed plan that includes the dimensions of your patio, the type of brick you’ll use, the laying pattern, and any other relevant details. This plan will serve as your roadmap throughout the project.
Step-by-Step Guide to Making a Brick Patio
Now that you’ve planned your patio, it’s time to get to work. Here’s a step-by-step guide to making a brick patio:
Step 1: Excavation and Base Preparation
The first step is to excavate the area where you’ll be building your patio. Dig down to a depth of at least 6-8 inches, removing any grass, topsoil, and debris. Compact the soil at the bottom of the excavation using a plate compactor or hand tamper. This creates a stable base for your patio.
Step 2: Installing the Base Layer
Next, add a layer of gravel or crushed stone to the excavation. This layer should be about 4-6 inches thick and will provide drainage and prevent the patio from settling. Compact the gravel layer using a plate compactor.
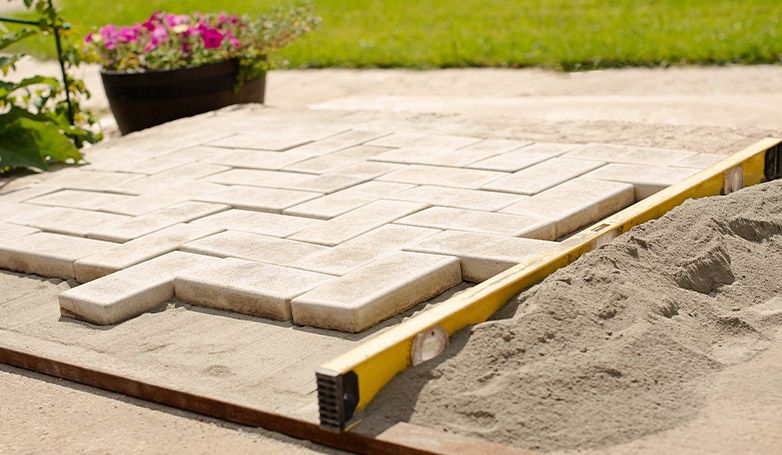
Step 3: Adding a Layer of Sand
Spread a layer of sand over the gravel base. This layer should be about 1-2 inches thick and will provide a smooth, level surface for laying the bricks. Use a screed board to level the sand, ensuring that it’s perfectly flat.
Step 4: Laying the Bricks
Now it’s time to start laying the bricks. Begin at one corner of the patio and work your way across, following your chosen laying pattern. Use a rubber mallet to gently tap each brick into place, ensuring that it’s level with the surrounding bricks. Leave a small gap (about 1/4 inch) between each brick to allow for expansion and contraction.
Step 5: Cutting the Bricks (If Necessary)
In some cases, you may need to cut bricks to fit around edges or corners. Use a brick saw or chisel and hammer to cut the bricks to the desired size and shape. Always wear safety glasses when cutting bricks.
Step 6: Filling the Joints
Once all the bricks are laid, fill the joints between them with sand. Sweep the sand across the patio, working it into the joints. Use a plate compactor with a rubber mat to compact the sand and settle the bricks into place. Add more sand as needed until the joints are completely filled.
Step 7: Sealing the Patio (Optional)
Sealing your brick patio is optional, but it can help to protect it from staining and weathering. Apply a brick sealant according to the manufacturer’s instructions. This will also help to enhance the color of the brick and make it easier to clean.
Maintaining Your Brick Patio: Keeping It Looking Its Best
With proper care and maintenance, your brick patio can last for many years. Here are some tips to keep it looking its best:
- Sweep Regularly: Sweep your patio regularly to remove dirt, leaves, and debris.
- Clean Spills Promptly: Clean up spills immediately to prevent staining.
- Wash Periodically: Wash your patio periodically with a mild detergent and water to remove dirt and grime.
- Repair Cracks and Chips: Repair any cracks or chips in the bricks as soon as possible to prevent further damage.
- Re-Sand Joints: Re-sand the joints between the bricks as needed to keep them filled and prevent weeds from growing.
Choosing the Right Materials and Tools for Your Brick Patio Project: Expert Recommendations
Selecting high-quality materials and the right tools is crucial for a successful brick patio project. Here are some expert recommendations:
Essential Materials:
- Bricks: Choose durable, weather-resistant bricks specifically designed for outdoor use. Consider clay bricks, concrete pavers, or reclaimed bricks for a unique look.
- Base Material: Use crushed stone or gravel as a base material for drainage and stability.
- Sand: Use coarse sand for leveling and setting the bricks.
- Joint Sand: Choose polymeric sand to fill the joints between the bricks. Polymeric sand helps prevent weed growth and stabilizes the patio.
- Edging Material: Consider using brick edging, plastic edging, or metal edging to contain the patio and prevent the bricks from shifting.
Essential Tools:
- Shovel: Use a shovel for excavating and moving materials.
- Wheelbarrow: Use a wheelbarrow for transporting materials around the job site.
- Tamper or Plate Compactor: Use a tamper or plate compactor to compact the soil and base material.
- Level: Use a level to ensure that the patio is level and even.
- Rubber Mallet: Use a rubber mallet to gently tap the bricks into place.
- Brick Saw or Chisel and Hammer: Use a brick saw or chisel and hammer to cut bricks to fit around edges or corners.
- Measuring Tape: Use a measuring tape to measure the area and ensure accurate brick placement.
- Safety Glasses: Always wear safety glasses when cutting bricks or working with tools.
- Gloves: Wear gloves to protect your hands from dirt and abrasion.
The Unmatched Benefits of Using Polymeric Sand for Your Brick Patio
Polymeric sand is a specialized type of sand that contains polymers that bind together when activated by water. Using polymeric sand in the joints of your brick patio offers several significant advantages:
- Weed Prevention: Polymeric sand creates a barrier that prevents weeds from growing in the joints between the bricks.
- Joint Stabilization: The polymers in the sand bind together, creating a strong and stable joint that prevents the bricks from shifting or settling.
- Erosion Control: Polymeric sand helps to prevent erosion by binding the sand particles together and preventing them from being washed away by rain or wind.
- Pest Resistance: Polymeric sand can help to deter insects and other pests from nesting in the joints between the bricks.
- Long-lasting Durability: Polymeric sand is designed to withstand weathering and wear, providing long-lasting durability and protection for your brick patio.
Brick Patio Design Ideas to Inspire Your Outdoor Oasis
Looking for inspiration for your brick patio design? Here are a few ideas to get you started:
- Classic Running Bond Patio: A simple and elegant design that features a running bond pattern with a brick border.
- Herringbone Patio with a Fire Pit: A visually appealing design that incorporates a herringbone pattern and a central fire pit.
- Circular Patio with a Water Feature: A unique and eye-catching design that features a circular patio with a water feature in the center.
- Multi-Level Patio with Steps: A functional and stylish design that incorporates multiple levels and steps to create a more dynamic outdoor space.
- Patio with a Pergola or Gazebo: Add a pergola or gazebo to your patio to create a shaded and inviting outdoor living area.
Expert Insights: Common Mistakes to Avoid When Making a Brick Patio
Even with careful planning and execution, some common mistakes can derail your brick patio project. Here are some expert insights to help you avoid these pitfalls:
- Insufficient Base Preparation: Failing to properly compact the soil and base material can lead to settling and unevenness in the patio.
- Inadequate Drainage: Poor drainage can cause water to pool on the patio, leading to damage and deterioration.
- Using the Wrong Type of Brick: Using bricks that are not designed for outdoor use can result in cracking, chipping, and fading.
- Incorrect Laying Pattern: Choosing a laying pattern that is too complex for your skill level can lead to frustration and a poorly executed patio.
- Neglecting to Fill the Joints: Failing to properly fill the joints between the bricks can allow weeds to grow and the bricks to shift.
Q&A: Expert Answers to Your Burning Brick Patio Questions
Here are some frequently asked questions about making a brick patio, answered by our team of experts:
- Q: How long does it take to build a brick patio?
A: The time it takes to build a brick patio depends on the size and complexity of the project, as well as your skill level. A small, simple patio can be completed in a weekend, while a larger, more complex patio may take several days or even weeks.
- Q: What is the best type of brick for a patio?
A: The best type of brick for a patio is one that is durable, weather-resistant, and specifically designed for outdoor use. Clay bricks and concrete pavers are both excellent choices.
- Q: How much does it cost to build a brick patio?
A: The cost of building a brick patio depends on the size of the patio, the type of brick you use, and whether you hire a professional contractor or do it yourself. On average, you can expect to pay between $10 and $20 per square foot.
- Q: Do I need to seal my brick patio?
A: Sealing your brick patio is optional, but it can help to protect it from staining and weathering. A sealant can also enhance the color of the brick and make it easier to clean.
- Q: How do I prevent weeds from growing in my brick patio?
A: The best way to prevent weeds from growing in your brick patio is to use polymeric sand to fill the joints between the bricks. Polymeric sand contains polymers that bind together, creating a barrier that prevents weeds from growing.
- Q: How do I clean my brick patio?
A: You can clean your brick patio with a mild detergent and water. Use a scrub brush to remove dirt and grime. For stubborn stains, you can use a pressure washer, but be careful not to damage the bricks.
- Q: How do I repair cracks or chips in my brick patio?
A: You can repair cracks or chips in your brick patio by replacing the damaged bricks. Use a chisel and hammer to remove the old brick, and then set a new brick in its place using mortar.
- Q: Can I build a brick patio on a slope?
A: Yes, you can build a brick patio on a slope, but it will require more planning and effort. You will need to create a level base for the patio by excavating and leveling the soil. You may also need to build retaining walls to support the patio.
- Q: How do I choose the right laying pattern for my brick patio?
A: The laying pattern you choose for your brick patio should complement your overall design and skill level. Simple patterns like running bond are easy to install, while more complex patterns like herringbone require more time and effort.
- Q: What is the best time of year to build a brick patio?
A: The best time of year to build a brick patio is in the spring or fall, when the weather is mild and there is less chance of rain. Avoid building a brick patio in the summer, when the heat can make it difficult to work.
Conclusion: Create Your Dream Outdoor Space with a Stunning Brick Patio
Making a brick patio is a rewarding project that can add beauty, value, and functionality to your home. By following the expert advice and step-by-step instructions in this guide, you can create a stunning outdoor space that you’ll enjoy for years to come. Remember to plan carefully, choose high-quality materials, and take your time to ensure a professional-looking result. Whether you’re looking to create a cozy seating area, an outdoor dining space, or a relaxing retreat, a brick patio is the perfect foundation for your dream outdoor living area.
Now that you’re armed with the knowledge and inspiration to make your own brick patio, we encourage you to take the next step! Share your plans or completed projects in the comments below, or explore our advanced guide to outdoor landscaping for more ideas. Contact our experts today for a personalized consultation to bring your patio vision to life!
