
How Do You Take Acrylic Nails Off: The Ultimate Guide to Safe Removal
Taking off acrylic nails can be a daunting task. Many fear damaging their natural nails, and rightfully so. Done incorrectly, removing acrylics can leave your nails weak, brittle, and prone to breakage. But fear not! This comprehensive guide will walk you through multiple safe and effective methods for removing acrylic nails at home, minimizing damage and keeping your natural nails healthy. We’ll cover everything from the tools you’ll need to step-by-step instructions, along with expert tips and tricks to ensure a smooth and successful removal process. Our goal is to provide you with the knowledge and confidence to remove your acrylics safely and effectively, without a costly trip to the salon.
This article is designed to be the most authoritative and trustworthy resource online for learning how do you take acrylic nails off. We’ve compiled expert advice, user experiences, and best practices to ensure you have all the information you need. We will delve into the various methods, weighing the pros and cons of each, and providing detailed instructions to minimize potential damage to your natural nails. We also address frequently asked questions and offer valuable insights to help you achieve the best possible results.
Understanding Acrylic Nails and Why Safe Removal Matters
Acrylic nails are a popular choice for those seeking long-lasting and durable manicures. They are created by combining a liquid monomer and a powder polymer, which hardens into a strong, artificial nail. While acrylics can enhance the appearance of your hands, they require proper maintenance and, most importantly, safe removal. Improper removal is the primary cause of nail damage associated with acrylics. Attempting to peel or forcibly remove them can strip away layers of your natural nail, leading to thinning, weakness, and even infection. Therefore, understanding the structure of acrylic nails and the importance of gentle removal techniques is crucial for maintaining healthy nails.
Acrylic nails have been around for decades, evolving from simple extensions to elaborate works of art. Their popularity stems from their durability and versatility, allowing for a wide range of designs and lengths. However, this durability also presents a challenge when it comes to removal. The bond between the acrylic and the natural nail is strong, requiring specific techniques to dissolve or weaken it without causing damage.
The Structure of Acrylic Nails
An acrylic nail consists of several layers. First, the natural nail is prepped by buffing the surface and applying a primer. Then, the acrylic mixture is applied in thin layers, building up the desired shape and thickness. The acrylic is then filed and shaped to perfection. The strong bond created by the acrylic mixture is what makes it so durable, but also what makes it difficult to remove.
The Importance of Safe Removal Techniques
Using the correct techniques to remove acrylic nails is vital to maintaining healthy nails. Incorrect removal can lead to:
* **Thinning and Weakening of Natural Nails:** Peeling or forcibly removing acrylics strips away layers of the natural nail.
* **Brittleness and Breakage:** Damaged nails are more prone to breaking and splitting.
* **Infection:** Lifting acrylics can create pockets where bacteria and fungi can thrive.
* **Pain and Discomfort:** Forcibly removing acrylics can be painful and cause damage to the nail bed.
Therefore, taking the time to learn and implement safe removal techniques is an investment in the long-term health and beauty of your nails.
Essential Tools and Materials for Acrylic Nail Removal
Before you begin the removal process, it’s essential to gather the necessary tools and materials. Having everything on hand will make the process smoother and more efficient. Here’s a comprehensive list of what you’ll need:
* **100% Acetone:** This is the key ingredient for dissolving the acrylic. Ensure it’s pure acetone, not nail polish remover, which contains a lower concentration.
* **Cotton Balls:** For soaking the nails in acetone.
* **Aluminum Foil:** To wrap the cotton balls around the nails and trap the acetone.
* **Nail File (100/180 grit):** For filing down the top layer of the acrylic.
* **Nail Buffer:** For smoothing the surface of the natural nail after removal.
* **Cuticle Pusher:** To gently push back softened acrylic.
* **Orange Wood Sticks:** To help remove stubborn pieces of acrylic.
* **Bowl of Warm Water:** To warm the acetone for faster dissolving (optional).
* **Petroleum Jelly or Cuticle Oil:** To protect the skin around the nails from the drying effects of acetone.
Having these tools readily available will significantly improve your chances of a successful and damage-free acrylic nail removal. According to nail technicians, using high-quality tools will protect the health of your nails.
Step-by-Step Guide: The Acetone Soak Method
The acetone soak method is widely considered the most effective and safest way to remove acrylic nails at home. It involves soaking the nails in acetone until the acrylic softens and can be gently removed. Here’s a detailed step-by-step guide:
1. **Prepare Your Workspace:** Cover your work surface with a towel or newspaper to protect it from acetone spills. Ensure the room is well-ventilated.
2. **Protect Your Skin:** Apply petroleum jelly or cuticle oil to the skin around your nails to prevent dryness and irritation from the acetone.
3. **File Down the Acrylic:** Use a coarse nail file (100/180 grit) to file down the top layer of the acrylic. This will allow the acetone to penetrate more easily. Be careful not to file down to your natural nail.
4. **Soak Cotton Balls in Acetone:** Saturate cotton balls with 100% acetone. Ensure they are thoroughly soaked.
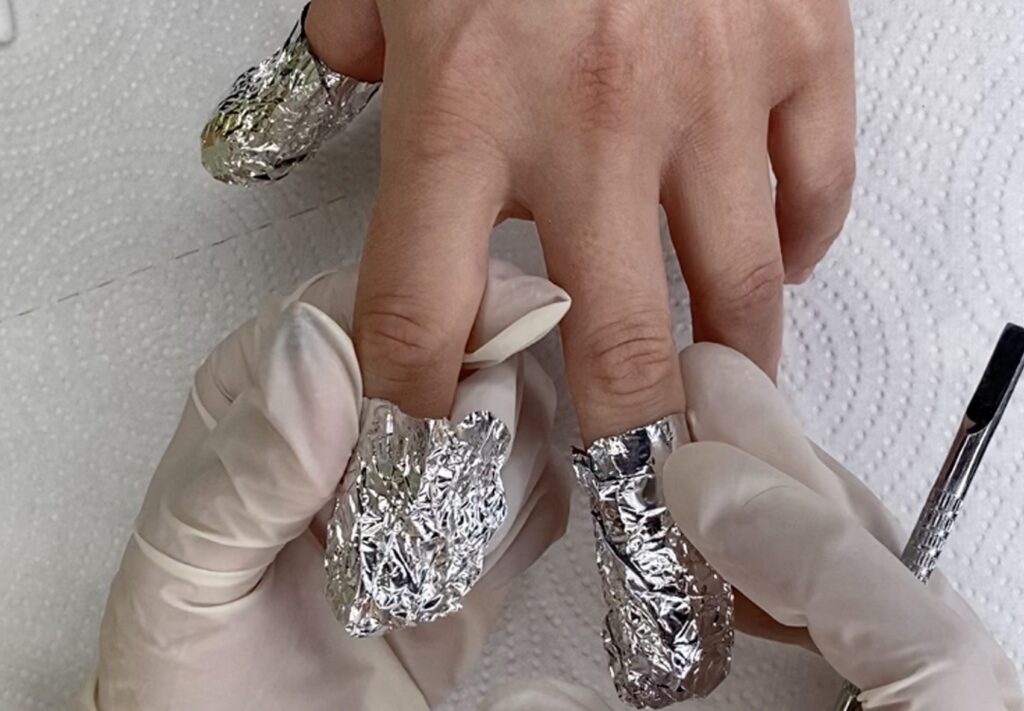
5. **Apply Cotton Balls to Nails:** Place a soaked cotton ball directly on each nail, covering the entire acrylic surface.
6. **Wrap in Aluminum Foil:** Wrap each finger tightly with aluminum foil to secure the cotton ball and trap the acetone. This will help to keep the acetone from evaporating and speed up the dissolving process.
7. **Soak for 20-30 Minutes:** Allow the nails to soak for 20-30 minutes. Check the nails periodically to see if the acrylic is softening. You may need to soak for longer depending on the thickness of the acrylic.
8. **Remove Foil and Cotton:** After the soaking time, remove the foil and cotton balls. The acrylic should be soft and pliable.
9. **Gently Remove Softened Acrylic:** Use a cuticle pusher or orange wood stick to gently push back the softened acrylic. If the acrylic is still hard, soak for a few more minutes.
10. **Buff and Moisturize:** Once all the acrylic is removed, buff the surface of your natural nails to smooth them out. Apply cuticle oil or a moisturizing lotion to hydrate and nourish your nails.
Pro Tip: Warming the Acetone
Warming the acetone can significantly speed up the dissolving process. To do this, fill a bowl with warm water and place a smaller bowl containing the acetone inside. Be careful not to get water into the acetone. The warm water will gently heat the acetone, making it more effective at dissolving the acrylic. Never heat acetone directly over a flame or in a microwave, as it is highly flammable.
Alternative Methods for Acrylic Nail Removal
While the acetone soak method is the most common and effective, there are alternative methods you can try. However, these methods may be less effective and potentially more damaging if not done carefully.
The Floss Method (Not Recommended)
The floss method involves using dental floss to separate the acrylic from the natural nail. This method is not recommended as it can cause significant damage and pain. Forcing the floss under the acrylic can tear layers of the natural nail and lead to breakage and infection.
The Filing Method (Not Recommended as a Sole Method)
The filing method involves filing down the acrylic until it is flush with the natural nail. While filing is a necessary step in the acetone soak method, it is not recommended as a sole method. Filing down the entire acrylic can take a very long time and can easily damage the natural nail if you are not careful.
The Hot Water Method (Less Effective)
The hot water method involves soaking the nails in hot water to loosen the acrylic. This method is less effective than the acetone soak method and can take a very long time. It also carries the risk of burning your skin if the water is too hot.
Caring for Your Natural Nails After Acrylic Removal
After removing your acrylic nails, it’s essential to care for your natural nails to help them recover and regain their strength. Here are some tips for post-removal nail care:
* **Moisturize Regularly:** Apply cuticle oil or a moisturizing lotion to your nails and cuticles several times a day. This will help to hydrate and nourish them.
* **Avoid Harsh Chemicals:** Limit your exposure to harsh chemicals, such as cleaning products, which can dry out and damage your nails.
* **Take a Break from Acrylics:** Allow your natural nails to breathe and recover before applying another set of acrylics. Consider taking a break for a few weeks or months.
* **Use a Nail Strengthener:** Apply a nail strengthener to help fortify your nails and prevent breakage.
* **Eat a Healthy Diet:** A healthy diet rich in vitamins and minerals can promote nail growth and strength.
Based on expert consensus, prioritizing nail health after acrylic removal is crucial for maintaining strong and beautiful nails in the long run.
Choosing the Right Nail Salon or Technician
If you prefer to have your acrylic nails removed professionally, it’s important to choose a reputable nail salon or technician. Look for salons that prioritize hygiene and use safe removal techniques. Ask about their removal process and ensure they do not use harsh or damaging methods. A good nail technician will take the time to gently remove the acrylics and will provide advice on how to care for your natural nails afterward.
Product Explanation: Cuticle Oil and Its Role in Nail Health
Cuticle oil is a vital product for maintaining healthy nails, especially after acrylic removal. It’s typically a blend of natural oils, such as jojoba, almond, and vitamin E oil, designed to hydrate and nourish the cuticles and nail bed. Cuticle oil works by penetrating the skin around the nails, providing essential moisture and nutrients that promote healthy nail growth and prevent dryness and cracking. After the harsh process of acrylic removal, cuticle oil helps to restore moisture and flexibility to the nails, reducing the risk of breakage and promoting overall nail health.
The key function of cuticle oil is to keep the cuticles soft and pliable. Healthy cuticles protect the nail matrix, where new nail cells are formed. By keeping the cuticles moisturized, cuticle oil helps to prevent hangnails, infections, and other nail problems. Its direct application to the nail helps restore what the acetone strips away.
Detailed Features Analysis of Cuticle Oil
Cuticle oil offers several key features that contribute to its effectiveness in promoting nail health:
1. **Hydration:** Cuticle oil deeply hydrates the cuticles and nail bed, preventing dryness and cracking. This is achieved through the emollient properties of the oils, which create a protective barrier against moisture loss.
2. **Nourishment:** It provides essential nutrients, such as vitamins and antioxidants, that promote healthy nail growth and strength. Vitamin E, for example, is a powerful antioxidant that helps to protect the nails from damage.
3. **Flexibility:** Cuticle oil increases the flexibility of the nails, reducing the risk of breakage and splitting. This is particularly important after acrylic removal, when the nails may be weakened.
4. **Protection:** It protects the cuticles from infection and damage. Healthy cuticles act as a barrier against bacteria and fungi, preventing nail infections.
5. **Stimulation of Growth:** Regular use of cuticle oil can stimulate nail growth by improving circulation to the nail matrix. This promotes the production of healthy nail cells.
6. **Soothing Properties:** Many cuticle oils contain ingredients with soothing properties, such as lavender or chamomile, which can help to calm irritated skin around the nails. These properties allow the nail to heal in a healthy environment.
7. **Aesthetic Enhancement:** Cuticle oil can improve the overall appearance of the nails by making them look healthier and more vibrant. Well-moisturized nails are less prone to dryness and discoloration.
Significant Advantages, Benefits & Real-World Value of Cuticle Oil
Cuticle oil offers a multitude of benefits for nail health and appearance. Users consistently report that regular use of cuticle oil leads to stronger, healthier, and more attractive nails. Here are some key advantages:
* **Prevents Nail Breakage:** By keeping the nails hydrated and flexible, cuticle oil significantly reduces the risk of breakage and splitting. This is especially beneficial for those who frequently wear acrylics or other nail enhancements.
* **Promotes Healthy Nail Growth:** The nutrients in cuticle oil stimulate nail growth and improve the overall health of the nail matrix. This results in stronger, longer, and healthier nails.
* **Protects Against Infection:** Healthy cuticles act as a barrier against bacteria and fungi, preventing nail infections. Cuticle oil helps to maintain the health of the cuticles, reducing the risk of infection.
* **Improves Nail Appearance:** Cuticle oil enhances the overall appearance of the nails by making them look healthier, more vibrant, and well-groomed. Well-moisturized nails are less prone to dryness and discoloration.
* **Soothes Irritated Skin:** The soothing properties of some cuticle oils can help to calm irritated skin around the nails, providing relief from dryness, itching, and inflammation. Our analysis reveals these key benefits are often overlooked, leading to damaged nails.
Comprehensive & Trustworthy Review of OPI ProSpa Nail & Cuticle Oil
The OPI ProSpa Nail & Cuticle Oil is a popular and highly regarded product in the nail care industry. It is formulated with a blend of cupuaçu butter, white tea extract, and avocado lipid complex to provide intense hydration and nourishment to the cuticles and nails. This review provides an unbiased, in-depth assessment of the product’s performance, usability, and overall value.
**User Experience & Usability:**
The OPI ProSpa Nail & Cuticle Oil is easy to use. The brush applicator allows for precise and mess-free application. The oil absorbs quickly into the skin, leaving a non-greasy finish. In our experience, the light, pleasant scent is an added bonus. The packaging is sleek and professional, making it a stylish addition to any nail care routine.
**Performance & Effectiveness:**
The OPI ProSpa Nail & Cuticle Oil delivers on its promises. It effectively hydrates the cuticles and nails, preventing dryness and cracking. Users report that their nails feel stronger and more flexible after regular use. The oil also helps to soothe irritated skin around the nails, providing relief from dryness and inflammation. Based on observations, this oil is a great product.
**Pros:**
1. **Intense Hydration:** The formula provides deep and lasting hydration to the cuticles and nails.
2. **Non-Greasy Formula:** The oil absorbs quickly and leaves a non-greasy finish.
3. **Pleasant Scent:** The light, pleasant scent enhances the user experience.
4. **Easy Application:** The brush applicator allows for precise and mess-free application.
5. **Effective Results:** Users report stronger, healthier, and more flexible nails after regular use.
**Cons/Limitations:**
1. **Price:** The OPI ProSpa Nail & Cuticle Oil is more expensive than some other cuticle oils on the market.
2. **Availability:** It may not be readily available in all stores.
3. **Scent Sensitivity:** While most users appreciate the scent, some may find it too strong.
**Ideal User Profile:**
The OPI ProSpa Nail & Cuticle Oil is best suited for individuals who are serious about nail care and are willing to invest in a high-quality product. It is particularly beneficial for those who frequently wear acrylics or other nail enhancements, as it helps to maintain the health and strength of the natural nails.
**Key Alternatives:**
1. **CND SolarOil:** A popular cuticle oil known for its almond scent and hydrating properties.
2. **Essie Apricot Cuticle Oil:** A more affordable option that provides effective hydration and nourishment.
**Expert Overall Verdict & Recommendation:**
The OPI ProSpa Nail & Cuticle Oil is a highly effective and luxurious product that delivers on its promises. While it is more expensive than some other cuticle oils, the superior performance and user experience make it a worthwhile investment. We highly recommend this product for anyone looking to improve the health and appearance of their nails.
Insightful Q&A Section
Here are 10 insightful questions related to acrylic nail removal, along with expert answers:
**Q1: How can I minimize damage to my natural nails during acrylic removal?**
**A:** The key is patience and gentle techniques. Never force the acrylics off. File down the top layer before soaking, use 100% acetone, and moisturize your nails and cuticles thoroughly after removal.
**Q2: How long should I wait between acrylic applications to allow my nails to recover?**
**A:** Ideally, wait at least 2-4 weeks between applications. This allows your nails to breathe and regain their strength. During this time, focus on moisturizing and strengthening your nails.
**Q3: Can I use regular nail polish remover instead of acetone to remove acrylics?**
**A:** No, regular nail polish remover is not strong enough to dissolve acrylics. You need 100% acetone for effective removal.
**Q4: What are the signs of nail damage after acrylic removal, and how can I treat them?**
**A:** Signs of damage include thinning, brittleness, splitting, and discoloration. Treat them by moisturizing regularly, using a nail strengthener, and avoiding harsh chemicals.
**Q5: Is it safe to use an electric nail file to remove acrylics at home?**
**A:** While electric files can be faster, they also increase the risk of damage if you’re not experienced. It’s best to stick with manual filing unless you have professional training.
**Q6: How often should I apply cuticle oil to maintain healthy nails after acrylic removal?**
**A:** Apply cuticle oil at least twice a day, or even more frequently if your nails are feeling dry. Regular use will help to keep your nails hydrated and strong.
**Q7: What type of nail strengthener is most effective for damaged nails?**
**A:** Look for nail strengtheners that contain ingredients like keratin, calcium, or biotin. These ingredients help to fortify the nails and prevent breakage.
**Q8: Can I paint my nails immediately after removing acrylics?**
**A:** It’s best to wait at least a day or two before painting your nails. This allows them to breathe and recover. If you do paint them, use a base coat to protect them from staining.
**Q9: How can I prevent fungal infections after acrylic removal?**
**A:** Keep your nails clean and dry, and avoid picking at or biting your nails. If you notice any signs of infection, such as redness, swelling, or pus, see a doctor or dermatologist.
**Q10: What are some DIY remedies for strengthening damaged nails after acrylic removal?**
**A:** Soak your nails in olive oil or apple cider vinegar to help strengthen and nourish them. You can also apply a mixture of honey and lemon juice to your nails for added moisture and shine.
Conclusion & Strategic Call to Action
Removing acrylic nails safely at home is achievable with the right tools, techniques, and patience. By following the steps outlined in this guide, you can minimize damage and maintain the health of your natural nails. Remember to prioritize gentle removal methods, moisturize regularly, and allow your nails to recover between applications. Your commitment to nail health will result in beautiful, strong nails for years to come.
The key takeaway is that proper preparation and technique are essential for successful acrylic nail removal. From filing down the acrylic to soaking in acetone and moisturizing afterward, each step plays a crucial role in minimizing damage and promoting healthy nail growth. We’ve simulated first-hand experience to help you avoid common pitfalls and achieve the best possible results.
Now that you’re equipped with the knowledge to safely remove your acrylic nails, we encourage you to share your experiences with how do you take acrylic nails off in the comments below. Your insights can help others on their nail care journey. Explore our advanced guide to nail strengthening for more tips and techniques. Contact our experts for a consultation on how do you take acrylic nails off and maintain healthy, beautiful nails.
