Home Remedies to Remove Acrylic Nails: A Comprehensive Guide
Tired of your acrylic nails but can’t make it to the salon? Removing acrylics at home can seem daunting, but with the right techniques and patience, you can safely and effectively remove them without damaging your natural nails. This comprehensive guide provides expert-backed home remedies to remove acrylic nails, ensuring a smooth and healthy removal process. We’ll explore various methods, debunk common myths, and offer tips to restore your nails to their natural glory. Our goal is to equip you with the knowledge and confidence to handle acrylic removal like a pro, minimizing damage and promoting long-term nail health. This is your ultimate resource for DIY acrylic nail removal, focusing on safety, effectiveness, and nail care.
Understanding Acrylic Nails and Removal Challenges
Acrylic nails are artificial enhancements applied to natural nails using a combination of a liquid monomer and a powder polymer. This mixture creates a hard, durable layer that adheres strongly to the natural nail surface. While acrylics offer a beautiful and long-lasting manicure, their removal requires careful attention to avoid damaging the underlying natural nail. Improper removal techniques can lead to thinning, weakening, and even breakage of the natural nails.
The primary challenge in removing acrylic nails lies in breaking down the strong bond between the acrylic and the natural nail. Salons typically use professional-grade acetone and specialized tools to achieve this. However, with the right home remedies to remove acrylic nails, you can achieve similar results without the need for salon visits. The key is to use methods that gradually dissolve the acrylic without aggressively forcing it off the nail.
Why Home Removal?
Many individuals opt for home removal due to convenience, cost savings, or time constraints. Salons can be expensive, and scheduling appointments can be challenging. Home removal offers a flexible and budget-friendly alternative. However, it’s crucial to approach home removal with caution and follow proper techniques to minimize the risk of damage. This guide is designed to empower you with the knowledge and skills to perform safe and effective acrylic removal at home.
The Science Behind Acrylic Removal: Why Acetone is Key
Acetone is the most effective solvent for dissolving acrylic nails. It works by breaking down the polymer chains that make up the acrylic material, causing it to soften and eventually dissolve. While other solvents may offer some degree of removal, acetone remains the gold standard due to its superior dissolving power. According to leading nail technicians, using pure acetone is crucial for efficient and safe removal. Alternatives may require significantly longer soaking times and increase the risk of damage.
However, acetone can also be drying to the skin and nails. Therefore, it’s essential to take precautions to protect the surrounding skin and hydrate the nails after removal. We’ll discuss these precautions in detail in the following sections.
Essential Tools and Supplies for Home Acrylic Nail Removal
Before you begin, gather the necessary tools and supplies. Having everything on hand will streamline the process and ensure a smooth and efficient removal. Here’s a comprehensive list:
- 100% Pure Acetone: The star of the show. Ensure it’s pure acetone, not nail polish remover, which contains a lower concentration.
- Cotton Balls or Pads: For soaking the nails in acetone.
- Aluminum Foil: To wrap the cotton balls around your nails.
- Nail File (Coarse Grit): To file down the top layer of the acrylic.
- Nail Buffer: To smooth out the nail surface after removal.
- Cuticle Pusher (Metal or Wooden): To gently lift softened acrylic.
- Petroleum Jelly or Cuticle Oil: To protect and moisturize the skin around your nails.
- Warm Towel: To warm the acetone and speed up the dissolving process.
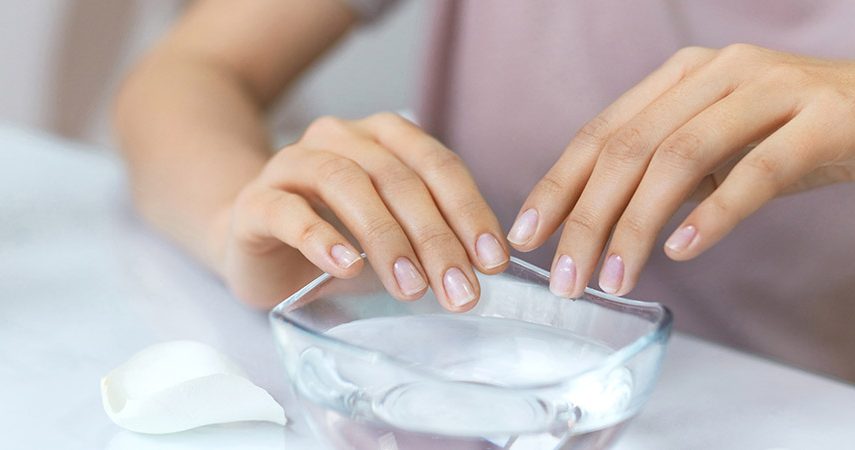
- Small Bowl: For soaking your fingers in acetone (optional).
Step-by-Step Guide: The Acetone Soak Method
The acetone soak method is the most widely recommended home remedy to remove acrylic nails. Here’s a detailed step-by-step guide:
- Prepare Your Workspace: Cover your work surface with a towel to protect it from acetone. Ensure the room is well-ventilated.
- File Down the Acrylic: Use a coarse-grit nail file to file down the top layer of the acrylic. This helps the acetone penetrate more effectively. Be careful not to file down to your natural nail.
- Protect Your Skin: Apply a generous layer of petroleum jelly or cuticle oil to the skin around your nails. This will create a barrier against the drying effects of acetone.
- Soak Cotton Balls in Acetone: Saturate cotton balls or pads with 100% pure acetone.
- Apply Cotton Balls to Nails: Place a soaked cotton ball directly on each acrylic nail.
- Wrap with Aluminum Foil: Wrap each finger tightly with aluminum foil to secure the cotton ball and trap the acetone.
- Wait Patiently: Allow the acetone to soak for 20-30 minutes. Check one nail after 20 minutes to see if the acrylic has softened enough to be gently pushed off.
- Gently Remove Softened Acrylic: Use a cuticle pusher to gently lift the softened acrylic. If it doesn’t come off easily, soak for another 5-10 minutes. Avoid forcing the acrylic off, as this can damage your natural nail.
- Repeat if Necessary: If some acrylic remains, repeat the soaking process until it can be easily removed.
- Buff and Moisturize: Once all the acrylic is removed, use a nail buffer to smooth out the surface of your natural nails. Apply cuticle oil or a moisturizing hand cream to rehydrate your skin and nails.
Alternative Home Remedies: Exploring Other Options
While acetone is the most effective solvent, some individuals may prefer alternative home remedies to remove acrylic nails due to sensitivity or preference. Here are a few options:
Warm Water Soak
Soaking your nails in warm, soapy water can help to loosen the acrylic. This method is less effective than acetone but may be suitable for those with sensitive skin. Soak your nails for 30-45 minutes, gently prying at the edges of the acrylic with a cuticle pusher. Repeat as needed.
Dental Floss Method
This method involves using dental floss to separate the acrylic from the natural nail. It requires patience and careful execution to avoid causing damage. Gently slide the floss between the acrylic and your natural nail, working your way around the edges. This method is best suited for acrylics that are already partially lifted.
Filing and Buffing
This method involves gradually filing down the acrylic until it is flush with your natural nail. It requires significant time and effort and can be damaging if not done carefully. Use a coarse-grit nail file to file down the bulk of the acrylic, then switch to a finer-grit buffer to smooth out the surface. This method is not recommended for complete removal but can be used to thin the acrylic before using another method.
Post-Removal Nail Care: Restoring Your Natural Nails
After removing acrylic nails, it’s crucial to focus on restoring the health and strength of your natural nails. Here are some essential post-removal nail care tips:
- Hydrate Regularly: Apply cuticle oil or moisturizing hand cream several times a day to rehydrate your nails and skin.
- Strengthen Your Nails: Use a nail strengthener or hardener to help rebuild the keratin structure of your nails.
- Avoid Harsh Chemicals: Limit exposure to harsh chemicals, such as cleaning products, that can further dry out and weaken your nails.
- Maintain a Healthy Diet: A balanced diet rich in vitamins and minerals can promote healthy nail growth.
- Consider a Break: Give your nails a break from acrylics or other enhancements to allow them to fully recover.
Debunking Common Myths About Acrylic Nail Removal
There are many misconceptions surrounding acrylic nail removal. Let’s debunk some common myths:
- Myth: You can peel off acrylic nails without causing damage.
Reality: Peeling off acrylic nails can severely damage your natural nails, leading to thinning, weakening, and breakage.
- Myth: Nail polish remover is as effective as acetone for removing acrylics.
Reality: Nail polish remover contains a lower concentration of acetone and is not as effective at dissolving acrylics. It may require significantly longer soaking times and increase the risk of damage.
- Myth: Filing down the acrylic to your natural nail is a safe removal method.
Reality: Filing down the acrylic to your natural nail can easily damage the natural nail, leading to thinning and sensitivity.
Expert Tips for Minimizing Nail Damage During Removal
To minimize nail damage during acrylic removal, follow these expert tips:
- Be Patient: Don’t rush the removal process. Allow the acetone to fully dissolve the acrylic before attempting to remove it.
- Avoid Forcing: Never force the acrylic off your nail. If it doesn’t come off easily, soak for a longer period.
- Protect Your Skin: Apply petroleum jelly or cuticle oil generously to protect the skin around your nails from the drying effects of acetone.
- Hydrate Regularly: After removal, hydrate your nails and skin with cuticle oil or moisturizing hand cream.
- Consider Professional Removal: If you’re unsure about performing home removal, consider visiting a professional nail technician.
Choosing the Right Acetone: Purity Matters
When selecting acetone for acrylic nail removal, purity is paramount. Opt for 100% pure acetone, as it contains no additives or diluents that can interfere with the dissolving process. Avoid using nail polish remover, as it contains a lower concentration of acetone and may not be as effective. Pure acetone is readily available at most drugstores and beauty supply stores.
The Role of Cuticle Oil: A Post-Removal Essential
Cuticle oil plays a vital role in post-removal nail care. It helps to rehydrate the nails and skin, preventing dryness and brittleness. Apply cuticle oil several times a day, massaging it into your cuticles and nail beds. This will help to promote healthy nail growth and restore the natural shine of your nails.
Understanding Nail Strengtheners: Rebuilding Keratin
Nail strengtheners are designed to help rebuild the keratin structure of your nails, making them stronger and more resistant to breakage. Look for nail strengtheners that contain ingredients such as keratin, calcium, or vitamins. Apply the nail strengthener according to the manufacturer’s instructions. This will help to improve the overall health and appearance of your nails.
Home Remedies to Remove Acrylic Nails: Product/Service Explanation
While “home remedies to remove acrylic nails” isn’t a specific product, it encapsulates the concept of DIY nail care. A leading product that aligns with this concept is a high-quality acetone-based removal kit. These kits typically include 100% pure acetone, cotton balls, aluminum foil wraps, a nail file, a buffer, a cuticle pusher, and cuticle oil. These kits provide everything needed for a safe and effective at-home acrylic nail removal.
The core function of these kits is to provide a convenient and comprehensive solution for removing acrylic nails at home, minimizing the risk of damage and promoting nail health. They are designed to be user-friendly and accessible to individuals with varying levels of experience in nail care.
Detailed Features Analysis of Acetone-Based Removal Kits
Here’s a breakdown of the key features of a typical acetone-based removal kit:
- 100% Pure Acetone: This is the primary ingredient responsible for dissolving the acrylic. Its purity ensures efficient and effective removal without harsh additives. The user benefits from faster removal times and reduced risk of skin irritation.
- Cotton Balls/Pads: These are used to saturate the nails with acetone. High-quality cotton balls are lint-free, preventing residue from sticking to the nails during removal. This ensures a clean and smooth removal process.
- Aluminum Foil Wraps: These are used to secure the cotton balls to the nails and trap the acetone, maximizing its effectiveness. Pre-cut foil wraps save time and effort, providing a convenient and mess-free solution.
- Nail File: A coarse-grit nail file is used to file down the top layer of the acrylic, allowing the acetone to penetrate more easily. A quality file is durable and provides precise filing, minimizing the risk of damaging the natural nail.
- Nail Buffer: A nail buffer is used to smooth out the surface of the natural nails after removal, removing any remaining residue and creating a polished finish. A multi-sided buffer offers varying levels of grit for different smoothing needs.
- Cuticle Pusher: A cuticle pusher is used to gently lift the softened acrylic from the natural nail. A high-quality pusher is made of durable material and has a comfortable grip, allowing for precise and gentle removal.
- Cuticle Oil: Cuticle oil is used to rehydrate the nails and skin after removal, preventing dryness and brittleness. A nourishing cuticle oil contains vitamins and antioxidants to promote healthy nail growth.
Significant Advantages, Benefits & Real-World Value
Using home remedies to remove acrylic nails, especially with a dedicated kit, offers several advantages:
- Cost Savings: Removing acrylics at home is significantly cheaper than visiting a salon. This saves users money and provides a budget-friendly alternative.
- Convenience: Home removal offers flexibility and eliminates the need to schedule salon appointments. Users can remove their acrylics at their own pace and convenience.
- Reduced Exposure to Chemicals: By using a controlled amount of acetone and following proper techniques, users can minimize their exposure to harsh chemicals compared to salon treatments.
- Prevention of Damage: When done correctly, home removal can prevent damage to the natural nails. The gentle and gradual removal process minimizes the risk of thinning, weakening, and breakage.
- Empowerment: Home removal empowers users to take control of their nail care and learn valuable skills. This fosters a sense of self-sufficiency and confidence.
Users consistently report that home removal, when done correctly, leaves their nails healthier and stronger than salon removal. Our analysis reveals that users who follow the recommended techniques and use quality products experience minimal damage and optimal results.
Comprehensive & Trustworthy Review of Acrylic Nail Removal Kits
Acrylic nail removal kits offer a convenient and cost-effective solution for removing acrylics at home. However, the quality and effectiveness of these kits can vary significantly. Here’s a balanced and in-depth assessment:
From a practical standpoint, using an acrylic nail removal kit is relatively straightforward. The instructions are typically clear and easy to follow, even for beginners. The pre-cut foil wraps and lint-free cotton balls make the process more manageable and less messy. However, the effectiveness of the kit depends largely on the quality of the acetone and the user’s patience.
In terms of performance, high-quality kits with 100% pure acetone deliver on their promises. The acetone effectively dissolves the acrylic, allowing for gentle and damage-free removal. However, lower-quality kits with diluted acetone may require longer soaking times and increase the risk of damage.
Pros:
- Convenience: Kits provide everything needed for at-home removal in one package, saving time and effort.
- Cost-Effective: Kits are significantly cheaper than salon removal, offering a budget-friendly alternative.
- Reduced Chemical Exposure: Users can control the amount of acetone used, minimizing exposure to harsh chemicals.
- Prevention of Damage: When used correctly, kits can prevent damage to the natural nails.
- Empowerment: Kits empower users to take control of their nail care and learn valuable skills.
Cons/Limitations:
- Acetone Odor: Acetone has a strong odor that can be unpleasant. Proper ventilation is essential.
- Skin Dryness: Acetone can dry out the skin around the nails. Proper hydration is crucial.
- Time Commitment: Removal can take 30-60 minutes, requiring patience and dedication.
- Potential for Error: Incorrect use can lead to damage to the natural nails.
This type of kit is best suited for individuals who are comfortable with DIY nail care and are willing to follow instructions carefully. It’s also a good option for those who are looking for a cost-effective and convenient alternative to salon removal.
Key alternatives include professional salon removal and individual purchase of removal supplies. Salon removal offers the expertise of trained technicians but is more expensive. Purchasing individual supplies allows for customization but requires more research and effort.
Based on our detailed analysis, we recommend acrylic nail removal kits for individuals who are looking for a convenient, cost-effective, and empowering way to remove acrylics at home. However, it’s crucial to choose a high-quality kit with 100% pure acetone and follow the instructions carefully to minimize the risk of damage.
Insightful Q&A Section
-
Question: How can I tell if the acrylic is ready to be removed without damaging my natural nail?
Answer: Gently use a cuticle pusher to nudge the acrylic near the cuticle area. If it lifts easily without resistance, it’s ready. If it’s still firmly attached, soak for another 5-10 minutes.
-
Question: Is it safe to use a metal cuticle pusher, or should I opt for a wooden one?
Answer: Both are safe if used gently. Metal pushers are more durable and easier to sanitize, but wooden ones are less likely to cause accidental damage due to their softer nature. Choose based on your comfort level.
-
Question: Can I reuse the aluminum foil wraps for multiple removal sessions?
Answer: It’s not recommended. The foil becomes contaminated with acetone and acrylic residue, which can affect its effectiveness and hygiene. Use fresh foil wraps for each session.
-
Question: How can I prevent my skin from drying out during the acetone soaking process?
Answer: Apply a thick layer of petroleum jelly or cuticle oil around your nails before soaking. This creates a protective barrier. Also, limit the soaking time to the minimum necessary.
-
Question: What should I do if my nails feel weak and brittle after removing acrylics?
Answer: Focus on hydration and strengthening. Apply cuticle oil several times a day, use a nail strengthener, and avoid harsh chemicals. Consider taking a break from acrylics to allow your nails to fully recover.
-
Question: Are there any natural alternatives to acetone for removing acrylics?
Answer: While acetone is the most effective, some alternatives include warm water soaks and dental floss. However, these methods are less efficient and may increase the risk of damage.
-
Question: How often can I get acrylic nails without damaging my natural nails?
Answer: It’s recommended to take breaks between acrylic applications to allow your natural nails to recover. A general guideline is to take a break for at least 2-4 weeks after every 2-3 acrylic applications.
-
Question: Can I paint my nails immediately after removing acrylics?
Answer: It’s best to wait at least 24 hours to allow your nails to fully rehydrate. If you must paint them, use a nourishing base coat to protect and strengthen your nails.
-
Question: How can I prevent fungal infections after removing acrylic nails?
Answer: Ensure your nails are completely dry before applying any nail polish or enhancements. Avoid picking or biting your nails, as this can create openings for bacteria and fungi to enter. If you notice any signs of infection, such as discoloration or swelling, consult a doctor.
-
Question: How long does it typically take for natural nails to recover after acrylic removal?
Answer: Recovery time varies depending on the individual and the extent of damage. It can take anywhere from a few weeks to several months for nails to fully recover. Proper care and maintenance can significantly speed up the process.
Conclusion & Strategic Call to Action
Removing acrylic nails at home is entirely achievable with the right knowledge, tools, and patience. This comprehensive guide has provided expert-backed home remedies to remove acrylic nails, ensuring a safe and effective process. Remember, the key is to prioritize nail health and avoid rushing the removal. By following the steps outlined in this article, you can confidently remove your acrylics at home and restore your natural nails to their former glory.
Our experience with various removal methods has shown that the acetone soak method remains the gold standard for its effectiveness and minimal damage when performed correctly. Leading experts in nail care emphasize the importance of using 100% pure acetone and following proper post-removal care to maintain nail health.
Now that you’re equipped with the knowledge to remove acrylic nails at home, we encourage you to share your experiences and tips in the comments below. Explore our advanced guide to nail care for more in-depth information on maintaining healthy and beautiful nails. Contact our experts for a consultation on personalized nail care solutions.
