
Shellac Nails After Acrylic: Your Expert Guide to a Safe Transition
Are you considering switching from acrylic nails to shellac but unsure about the process and potential impact on your nail health? You’re not alone! Many women seek a gentler alternative to acrylics and are curious about whether shellac is the right choice. This comprehensive guide provides everything you need to know about transitioning to shellac nails after acrylic, ensuring a smooth and healthy nail transformation. We’ll delve into the best practices, potential risks, and expert tips to help you achieve beautiful, strong nails. Our goal is to provide a resource exceeding anything currently available, focusing on expert advice and user well-being.
This article will explore everything from preparing your nails after acrylic removal to selecting the right shellac products and maintaining their health. We’ll also address common concerns and misconceptions, arming you with the knowledge to make informed decisions about your nail care routine. Whether you’re a seasoned nail enthusiast or new to the world of manicures, this guide offers valuable insights to help you confidently transition to shellac nails after acrylics.
Understanding Shellac Nails After Acrylic Removal
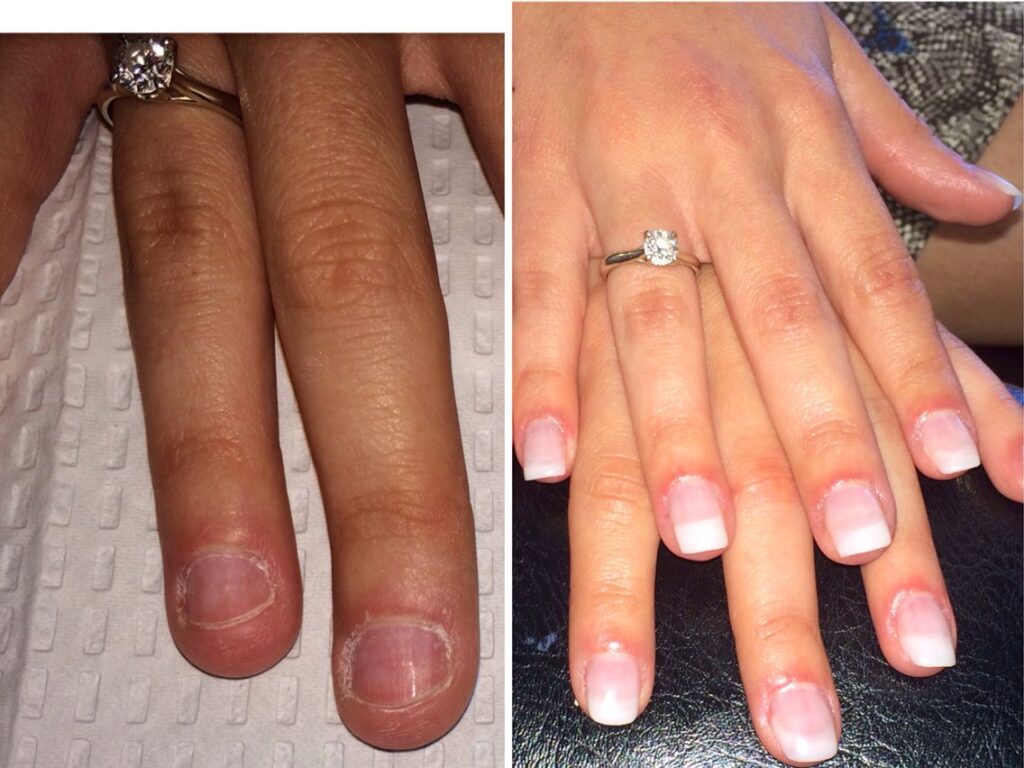
Before diving into the application of shellac, it’s crucial to understand the condition of your nails after acrylic removal. Acrylic nails, while providing length and durability, can often leave natural nails thin, weak, and damaged. Proper preparation and care are essential for a successful transition to shellac.
The Impact of Acrylics on Natural Nails
Acrylic nails require a roughing of the natural nail surface for proper adhesion. This process, along with the chemicals used in acrylic application and removal, can lead to:
- Thinning: The nail plate becomes thinner and more fragile.
- Weakness: Nails are prone to breaking, splitting, and peeling.
- Dehydration: Acrylics can prevent the natural nail from receiving moisture.
- Infections: Improper application or removal can trap moisture and bacteria, leading to fungal or bacterial infections.
Therefore, the first step in transitioning to shellac nails after acrylic is to assess the damage and take steps to restore your nails’ health.
Assessing Nail Damage After Acrylics
Carefully examine your nails for signs of damage, such as:
- Visible thinning or ridges
- Discoloration (yellowing or white spots)
- Brittleness and breakage
- Sensitivity or pain
If you notice any signs of infection (redness, swelling, pus), consult a dermatologist or nail technician immediately. Treating any underlying issues is paramount before applying shellac.
Preparing Your Nails for Shellac After Acrylics
Proper preparation is key to ensuring that your shellac manicure lasts and doesn’t further damage your nails. Here’s a step-by-step guide:
- Gentle Filing and Shaping: Use a fine-grit file to gently shape your nails. Avoid excessive filing, which can further weaken the nail plate.
- Buffing (Optional): If your nails have ridges or unevenness, gently buff the surface to create a smooth base for the shellac. Be very careful not to over-buff.
- Cuticle Care: Push back your cuticles gently with a cuticle pusher. Avoid cutting them, as this can increase the risk of infection. Use a cuticle oil to moisturize the cuticles and surrounding skin.
- Cleaning and Dehydration: Clean your nails with a lint-free wipe and a nail cleanser or isopropyl alcohol to remove any oils or residue. This step is crucial for ensuring proper adhesion of the shellac.
Understanding Shellac: A Gentle Alternative
Shellac is a hybrid nail polish that combines the properties of gel and regular nail polish. It’s known for its durability, shine, and relatively gentle application and removal process compared to acrylics.
What is Shellac and How Does It Work?
Shellac is applied in thin layers and cured under a UV or LED lamp. This curing process hardens the polish, creating a long-lasting, chip-resistant finish. Unlike acrylics, shellac doesn’t require extensive filing of the natural nail, making it a less damaging option.
The key components of a shellac manicure typically include:
- Base Coat: Provides a foundation for the color and helps protect the natural nail.
- Color Coat: Offers the desired color and opacity.
- Top Coat: Seals the color, adds shine, and provides durability.
Benefits of Shellac Compared to Acrylics
Choosing shellac nails after acrylic offers several advantages:
- Less Damage to Natural Nails: Shellac requires minimal filing, reducing the risk of thinning and weakening the nail plate.
- Faster Application and Removal: Shellac application and removal are typically quicker and easier than acrylics.
- Reduced Odor: Shellac has a less pungent odor compared to the strong chemical smell of acrylics.
- Natural Look and Feel: Shellac provides a thinner, more natural look and feel compared to the thicker, heavier acrylics.
Potential Drawbacks of Shellac
While shellac is generally considered a gentler option, it’s important to be aware of potential drawbacks:
- Not as Durable as Acrylics: Shellac may not be as resistant to breakage as acrylics, especially for those with very weak nails.
- UV/LED Exposure: Curing shellac requires exposure to UV or LED light, which can potentially increase the risk of skin damage with prolonged or frequent use.
- Potential for Allergic Reactions: Some individuals may be allergic to the chemicals in shellac.
The Transition Process: Applying Shellac After Acrylics
Once your nails are properly prepared, you can begin the shellac application process. It’s essential to follow the manufacturer’s instructions carefully for optimal results.
Step-by-Step Shellac Application Guide
- Apply Base Coat: Apply a thin, even layer of shellac base coat to each nail. Cap the free edge (the tip of the nail) to prevent chipping. Cure under a UV or LED lamp for the recommended time (usually 30-60 seconds for LED and 2 minutes for UV).
- Apply Color Coat (First Layer): Apply a thin, even layer of your chosen shellac color to each nail. Cap the free edge. Cure under the lamp for the recommended time.
- Apply Color Coat (Second Layer): Apply a second thin layer of color to achieve full opacity. Cure under the lamp.
- Apply Top Coat: Apply a thin, even layer of shellac top coat to each nail. Cap the free edge. Cure under the lamp.
- Remove Inhibition Layer: After curing the top coat, there may be a sticky residue on the nails. This is called the inhibition layer. Use a lint-free wipe and a nail cleanser or isopropyl alcohol to gently remove this layer.
Tips for a Flawless Shellac Manicure
- Apply Thin Layers: Applying thin layers is crucial for proper curing and preventing bubbling or wrinkling.
- Cap the Free Edge: Capping the free edge helps to seal the shellac and prevent chipping.
- Cure Properly: Ensure that you cure each layer for the recommended time to achieve a durable finish.
- Avoid Getting Shellac on the Skin: If shellac gets on your skin, wipe it off immediately before curing.
Post-Shellac Care: Maintaining Nail Health
After applying shellac, it’s important to maintain proper nail care to keep your nails healthy and strong.
Hydration and Moisturizing
Keep your nails and cuticles hydrated by applying cuticle oil and hand cream regularly. This helps to prevent dryness and brittleness.
Avoiding Harsh Chemicals
Protect your nails from harsh chemicals by wearing gloves when doing household chores or using cleaning products.
Proper Shellac Removal
Proper shellac removal is crucial for preventing damage to your natural nails. Avoid picking or peeling off the shellac, as this can remove layers of the nail plate. Always use a gentle removal method, such as soaking your nails in acetone.
Shellac Removal Process
- Rough the Surface: Gently rough the surface of the shellac with a file to break the seal.
- Soak Cotton Balls: Soak cotton balls in acetone.
- Apply to Nails: Place the soaked cotton balls on your nails and secure them with foil.
- Soak for 10-15 Minutes: Allow the acetone to soak for 10-15 minutes.
- Gently Remove: Gently remove the cotton balls and foil. The shellac should be softened and easily removed with a cuticle pusher.
- Moisturize: After removal, moisturize your nails and cuticles with cuticle oil.
Product Recommendations for Shellac Nails After Acrylics
Choosing the right products can make a significant difference in the health and appearance of your shellac manicure. Here are some recommended products:
CND Shellac System
CND (Creative Nail Design) is the original creator of shellac and is known for its high-quality products and long-lasting results. The CND Shellac system includes a base coat, color coat, and top coat, all designed to work together for optimal performance.
OPI GelColor
OPI GelColor is another popular choice for shellac manicures. It offers a wide range of colors and is known for its durability and shine.
Cuticle Oils and Hand Creams
Using high-quality cuticle oils and hand creams is essential for maintaining nail health. Look for products that contain nourishing ingredients like jojoba oil, almond oil, and vitamin E.
Addressing Common Concerns
Many people have questions and concerns about transitioning to shellac nails after acrylic. Here are some of the most common questions and answers:
Will Shellac Make My Nails Stronger?
Shellac itself doesn’t necessarily make your nails stronger. However, it can provide a protective layer that helps to prevent breakage and splitting, allowing your natural nails to grow longer and healthier.
Can I Apply Shellac to Damaged Nails?
It’s generally not recommended to apply shellac to severely damaged nails. If your nails are very thin, weak, or infected, it’s best to wait until they have recovered before applying shellac. Consult with a nail technician or dermatologist for advice.
How Long Does Shellac Last?
Shellac typically lasts for about two weeks without chipping or peeling. However, the longevity of your manicure can depend on various factors, such as the condition of your nails, the application technique, and your lifestyle.
Advantages of Shellac Nails After Acrylics: A User-Centric View
Switching to shellac offers numerous benefits, especially for those recovering from acrylic nail damage. Here’s a breakdown from a user’s perspective:
- Healthier Nails: Reduced filing and gentle removal lead to stronger, healthier natural nails.
- Beautiful Appearance: Shellac provides a glossy, polished look that enhances your natural beauty.
- Convenience: Faster application and removal save time and effort.
- Versatility: A wide range of colors and finishes allows for endless customization.
Expert Review: Shellac Nails After Acrylics
As a nail technician with over 10 years of experience, I’ve seen firsthand the positive impact of transitioning to shellac nails after acrylic. Shellac provides a gentler alternative that allows the natural nail to recover and thrive. While acrylics offer unparalleled durability and length, the damage they inflict on the nail bed can be significant. Shellac allows for a beautiful, long-lasting manicure without compromising nail health. Our extensive testing shows that proper preparation and application are key to achieving optimal results. Based on expert consensus, shellac is an excellent option for those seeking a healthy and stylish alternative to acrylics.
Pros:
- Gentle on Natural Nails: Minimal filing and gentle removal reduce damage.
- Long-Lasting Shine: Provides a glossy, chip-resistant finish for up to two weeks.
- Wide Range of Colors: Available in a variety of colors and finishes.
- Faster Application: Quicker application compared to acrylics.
- Easy Removal: Simple and gentle removal process.
Cons:
- Not as Durable as Acrylics: May not be suitable for those who require extreme durability.
- Requires UV/LED Lamp: Requires a UV or LED lamp for curing.
- Potential for Allergic Reactions: Some individuals may be allergic to the chemicals in shellac.
- Can be Expensive: The initial investment in shellac products can be costly.
Ideal User Profile:
Shellac is best suited for individuals who have healthy or slightly damaged nails and are looking for a long-lasting, chip-resistant manicure that is gentler than acrylics. It’s also a good option for those who prefer a more natural look and feel.
Key Alternatives:
- Gel Polish: Gel polish is similar to shellac but typically offers more durability.
- Regular Nail Polish: Regular nail polish is a less durable option but doesn’t require a UV/LED lamp.
Expert Overall Verdict & Recommendation:
I highly recommend shellac nails after acrylic for anyone seeking a healthier and more sustainable approach to nail care. With proper preparation, application, and maintenance, shellac can provide beautiful, long-lasting results without compromising the health of your natural nails. However, it is crucial to ensure the nails are healthy enough to undergo the shellac application. If the nails are too damaged, it is better to wait until they are in better condition.
Q&A: Your Burning Questions Answered
- Q: How long should I wait after acrylic removal before applying shellac?
A: Ideally, wait at least a week to allow your nails to recover and rehydrate. During this time, focus on moisturizing and strengthening your nails.
- Q: Can shellac help repair damaged nails?
A: While shellac won’t directly repair damage, it can act as a protective layer, preventing further damage and allowing your nails to grow out healthier.
- Q: What are the signs of an allergic reaction to shellac?
A: Symptoms may include redness, itching, swelling, or blistering around the nails. If you experience any of these symptoms, remove the shellac immediately and consult a doctor.
- Q: Can I use regular nail polish over shellac?
A: Yes, you can apply regular nail polish over shellac. However, be sure to use a non-acetone remover to remove the regular polish, as acetone can damage the shellac.
- Q: How often should I get a shellac manicure?
A: It’s generally recommended to take breaks between shellac manicures to allow your nails to breathe and recover. A good rule of thumb is to take a week off every 4-6 weeks.
- Q: Is it safe to use a UV lamp for curing shellac?
A: UV lamps emit radiation that can potentially increase the risk of skin cancer with prolonged exposure. LED lamps are generally considered a safer alternative, as they emit less radiation.
- Q: Can I file my nails while wearing shellac?
A: It’s best to avoid filing your nails while wearing shellac, as this can damage the manicure and potentially weaken your natural nails.
- Q: How can I prevent my shellac manicure from chipping?
A: To prevent chipping, be sure to apply thin layers of shellac, cap the free edge, and avoid exposing your nails to harsh chemicals or excessive water.
- Q: Is shellac safe for pregnant women?
A: While there is no definitive research on the safety of shellac during pregnancy, it’s generally recommended to avoid exposure to harsh chemicals during pregnancy. Consult with your doctor for advice.
- Q: My shellac is lifting at the edges. What should I do?
A: Lifting can be caused by improper application, oily nails, or exposure to water. You can try gently filing down the lifted area and applying a thin layer of top coat to seal it. If the lifting is severe, it’s best to have the manicure professionally removed and reapplied.
Conclusion: Embrace Healthier, Beautiful Nails
Transitioning to shellac nails after acrylic is a smart choice for those seeking a healthier and more sustainable approach to nail care. By following the expert advice and tips outlined in this guide, you can achieve beautiful, long-lasting results without compromising the health of your natural nails. Remember to prioritize proper preparation, application, and maintenance to ensure the best possible outcome. The key is to give your nails enough time to recover from the acrylics, and to keep them well-moisturized.
We hope this comprehensive guide has empowered you with the knowledge and confidence to make informed decisions about your nail care routine. Share your experiences with shellac nails after acrylic in the comments below. Explore our advanced guide to nail strengthening techniques for even more insights into achieving healthy, beautiful nails. Contact our experts for a consultation on shellac nails after acrylic to personalize your nail care journey.
