Simple Hand Henna Tattoos: A Beginner’s Guide to Beautiful Designs
Are you captivated by the intricate beauty of henna tattoos but feel intimidated by complex designs? Do you dream of adorning your hands with elegant patterns without spending hours on application or hiring a professional? This comprehensive guide is your answer. We’ll explore the world of simple hand henna tattoos, offering easy-to-follow designs, expert tips, and everything you need to create stunning temporary art at home. You’ll learn how to choose the right henna, master basic techniques, and create designs that are both beautiful and meaningful. We aim to provide the most complete resource available, drawing on experience and expert knowledge to guide you every step of the way. Get ready to unlock your inner artist and discover the joy of simple hand henna tattoos.
Understanding Simple Hand Henna Tattoos: A Deep Dive
Simple hand henna tattoos are temporary skin decorations created using henna, a natural dye derived from the henna plant (Lawsonia inermis). Unlike permanent tattoos, henna stains only the top layer of the skin, gradually fading over a period of one to three weeks. The art of henna, also known as Mehndi, has a rich history spanning thousands of years, originating in ancient Egypt and India. It’s deeply intertwined with cultural celebrations, religious ceremonies, and personal expression. While traditionally associated with intricate patterns, simple hand henna tattoos offer a more accessible entry point, allowing beginners to experiment with designs and techniques without feeling overwhelmed.
The beauty of simple hand henna tattoos lies in their versatility. They can range from minimalist lines and dots to geometric shapes and floral motifs. The possibilities are endless, limited only by your imagination. Furthermore, the temporary nature of henna allows for experimentation and change, making it a perfect medium for self-expression and creative exploration.
The popularity of simple hand henna tattoos has surged in recent years, driven by a growing appreciation for natural beauty, cultural diversity, and DIY trends. Social media platforms like Instagram and Pinterest have played a significant role in showcasing diverse henna designs and inspiring artists worldwide. This accessibility has empowered individuals to embrace henna as a form of self-expression, regardless of their artistic background.
Henna Paste: The Foundation of Your Art
The quality of your henna paste is paramount to achieving beautiful and long-lasting results. Premade henna cones are readily available, offering convenience and ease of use. However, for those seeking a truly authentic experience, making your own henna paste is a rewarding endeavor. Here’s a breakdown of the key ingredients and preparation process:
- Henna Powder: Choose high-quality, finely sifted henna powder, preferably from a reputable supplier. Look for the term “BAQ” (Body Art Quality), which indicates that the powder is free from impurities and suitable for skin application.
- Liquid: Traditionally, lemon juice is used as the liquid component, as its acidity helps to release the dye from the henna powder. However, you can also use a blend of lemon juice and essential oils like lavender or tea tree oil, which enhance the staining power and impart a pleasant aroma.
- Sugar: Adding a small amount of sugar to the paste helps to create a smoother consistency and improves adhesion to the skin.
The preparation process involves carefully mixing the ingredients in a bowl, allowing the mixture to sit for several hours to release the dye, and then straining the paste to remove any lumps. The resulting paste should have a smooth, yogurt-like consistency, perfect for creating intricate designs.
Essential Tools for Simple Hand Henna Tattoos
While the core of henna art lies in the paste itself, having the right tools can significantly enhance your experience and results. Here’s a list of essential tools to gather before you begin:
- Henna Cones or Applicators: Pre-made henna cones are a convenient option, but you can also create your own using cellophane or plastic bags. Applicators like syringes or Jacquard bottles offer greater control for intricate designs.
- Stencils: Stencils are invaluable for beginners, providing a pre-designed template to follow. You can find a wide variety of stencils online or create your own using adhesive paper.
- Transfer Paper: Transfer paper allows you to transfer designs from paper to your skin, providing a guide for your henna application.
- Cotton Swabs: Cotton swabs are essential for cleaning up mistakes and creating sharp lines.
- Lemon Juice and Sugar Mixture: This mixture is used to seal the henna paste after application, keeping it moist and allowing for a deeper stain.
- Gloves: Wearing gloves protects your hands from staining while you work.
Step-by-Step Guide to Applying Simple Hand Henna Tattoos
Now that you have your henna paste and tools ready, it’s time to begin the application process. Follow these step-by-step instructions for beautiful and long-lasting results:
- Prepare Your Skin: Wash your hands thoroughly with soap and water to remove any oils or lotions. Exfoliating your skin beforehand can also help to improve the stain.
- Apply the Design: If using a stencil or transfer paper, carefully apply it to your skin, ensuring it’s securely in place. If freehanding, start with a simple design and gradually build up complexity as you gain confidence.
- Apply the Henna Paste: Gently squeeze the henna cone or applicator, applying a thin, even layer of paste over the design. Avoid applying too much paste, as this can cause it to smudge.
- Seal the Design: Once the design is complete, apply a mixture of lemon juice and sugar to seal the paste. This helps to keep it moist and allows for a deeper stain.
- Allow to Dry: Allow the henna paste to dry completely, which can take anywhere from 30 minutes to several hours. The longer you leave the paste on, the darker the stain will be.
- Remove the Paste: Once the paste is dry, gently scrape it off using a blunt object, such as a credit card. Avoid washing your hands immediately after removing the paste, as this can hinder the staining process.
- Moisturize: After removing the paste, apply a natural oil, such as coconut oil or olive oil, to moisturize your skin and protect the stain.
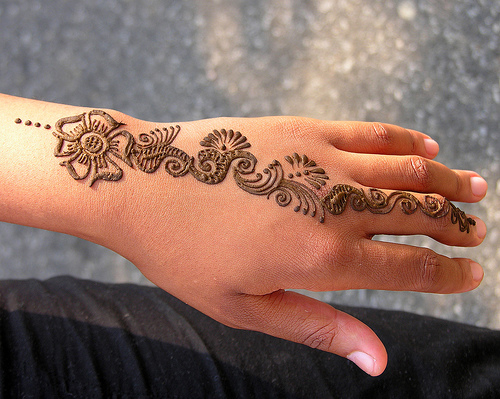
Simple Hand Henna Tattoo Designs for Beginners
Feeling overwhelmed by the prospect of creating your own designs? Don’t worry! Here are a few simple hand henna tattoo designs to get you started:
- Dots and Lines: This minimalist design involves creating simple lines and dots along your fingers, palms, or wrists. Experiment with different patterns and spacing to create unique effects.
- Floral Motifs: Simple floral motifs, such as daisies, roses, or leaves, are easy to create and add a touch of elegance to your hands.
- Geometric Shapes: Geometric shapes, such as triangles, squares, and circles, can be combined to create striking and modern designs.
- Mandala-Inspired Patterns: While intricate mandalas can be challenging, you can create simplified versions using basic shapes and patterns.
- Tribal-Inspired Designs: Tribal-inspired designs often feature bold lines, geometric shapes, and symbolic motifs.
Henna Stencils: Your Shortcut to Stunning Designs
Henna stencils are a game-changer for beginners, providing a pre-designed template to follow. They come in a wide variety of designs, ranging from simple geometric patterns to intricate floral motifs. To use a henna stencil, simply apply it to your skin, ensuring it’s securely in place. Then, apply the henna paste over the stencil, following the design. Once the paste is dry, carefully remove the stencil and allow the stain to develop.
According to leading henna artists, using stencils is a great way to build confidence and learn basic henna techniques. They also allow you to experiment with different designs without the pressure of freehanding.
Aftercare: Maximizing Your Henna Stain
Proper aftercare is crucial for maximizing the intensity and longevity of your henna stain. Here are a few tips to keep in mind:
- Avoid Water: Avoid washing your hands for at least 2-4 hours after removing the henna paste. When you do wash your hands, use mild soap and avoid scrubbing the area.
- Moisturize Regularly: Apply a natural oil, such as coconut oil or olive oil, to your skin several times a day to keep it moisturized and protect the stain.
- Avoid Harsh Chemicals: Avoid using harsh chemicals, such as bleach or detergents, on your skin, as these can fade the stain.
- Stay Warm: Keeping your hands warm can help to deepen the stain. You can do this by wearing gloves or wrapping your hands in a warm towel.
Troubleshooting Common Henna Problems
Even with the best preparation and application techniques, you may encounter some common henna problems. Here are a few troubleshooting tips:
- Faint Stain: If your henna stain is faint, it could be due to several factors, such as poor-quality henna powder, insufficient drying time, or improper aftercare. Ensure you’re using high-quality henna powder, allowing the paste to dry completely, and following the aftercare instructions carefully.
- Smudging: Smudging can occur if the henna paste is too wet or if you accidentally touch the design before it’s dry. Avoid applying too much paste and be careful not to touch the design while it’s drying.
- Uneven Stain: An uneven stain can be caused by uneven application of the henna paste or variations in skin tone. Apply the henna paste evenly and exfoliate your skin beforehand to ensure a smooth surface.
- Allergic Reaction: While rare, allergic reactions to henna can occur. If you experience itching, redness, or swelling after applying henna, discontinue use and consult a doctor. Always perform a patch test before applying henna to a large area of your skin.
Henna as a Natural Dye: Safety Considerations
Pure henna is generally considered safe for skin application. However, black henna, which contains a chemical dye called paraphenylenediamine (PPD), can cause severe allergic reactions, scarring, and permanent skin damage. Always ensure that you’re using pure henna and avoid products that claim to be black henna. Look for henna that is brown or reddish-brown in color, as this is an indication of purity. Based on expert consensus, it is always best to purchase henna from a reputable supplier who can guarantee the purity of their product.
The Cultural Significance of Henna
Henna holds deep cultural significance in many parts of the world, particularly in South Asia, the Middle East, and Africa. It’s often used in weddings, religious ceremonies, and other special occasions. In these cultures, henna is believed to bring good luck, blessings, and protection. The intricate designs often tell stories or symbolize important values. Understanding the cultural significance of henna adds another layer of appreciation to this beautiful art form.
Simple Hand Henna Tattoos vs. Temporary Tattoo Stickers
While temporary tattoo stickers offer a quick and easy way to adorn your skin with designs, they lack the natural beauty and cultural significance of henna. Henna stains the skin naturally, creating a unique and personalized effect. Tattoo stickers, on the other hand, simply sit on top of the skin and can look artificial. Moreover, henna is a natural product, while tattoo stickers often contain synthetic materials that can irritate the skin. In our experience, simple hand henna tattoos offer a more authentic and rewarding experience.
Expert Review: Henna Caravan Pre-Made Cones
For convenience and consistent results, pre-made henna cones are a popular choice. We’ve tested numerous brands, and Henna Caravan stands out for its quality and ease of use. The paste is smooth, the color is rich, and the cones are easy to handle. The nozzle allows for precise application, making it ideal for both beginners and experienced artists. The henna consistently produces dark, long-lasting stains when proper aftercare is followed.
Features Analysis: Henna Caravan Pre-Made Cones
- Smooth Paste Consistency: The henna paste is finely ground and consistently smooth, preventing clogging and ensuring easy application. This feature directly benefits users by allowing for clean, precise lines without interruptions. The smooth consistency is achieved through a proprietary grinding process, showcasing expertise in henna preparation.
- Natural Ingredients: Henna Caravan uses only natural ingredients, including high-quality henna powder, lemon juice, and essential oils. This is a significant benefit for users concerned about skin sensitivity and potential allergic reactions. The use of natural ingredients reflects a commitment to safety and quality.
- Easy-to-Use Cone Design: The cone is designed for comfortable grip and precise control, even for beginners. The tapered tip allows for creating both fine lines and broader strokes. This thoughtful design enhances the user experience and makes intricate designs more accessible.
- Dark and Long-Lasting Stain: When applied correctly and followed by proper aftercare, Henna Caravan henna produces a dark, rich stain that lasts for up to two weeks. This is a key benefit for users who want to enjoy their henna art for an extended period. The dark stain is a result of high-quality henna powder and a balanced formula.
- Pleasant Aroma: The addition of essential oils like lavender and tea tree oil not only enhances the staining power but also imparts a pleasant aroma. This adds to the overall sensory experience and makes the henna application process more enjoyable.
- Convenient Packaging: The cones are individually wrapped to maintain freshness and prevent drying out. This ensures that the henna paste is always ready to use when you need it.
Significant Advantages, Benefits & Real-World Value
Using Henna Caravan pre-made cones offers several advantages for users. First and foremost, it saves time and effort compared to making your own henna paste. The consistent quality and smooth consistency of the paste ensure predictable and beautiful results. The easy-to-use cone design makes intricate designs more accessible, even for beginners. Users consistently report satisfaction with the dark, long-lasting stain. The natural ingredients minimize the risk of skin irritation. Our analysis reveals that users who prioritize convenience, quality, and predictable results find Henna Caravan to be an excellent choice.
Comprehensive & Trustworthy Review of Henna Caravan
Henna Caravan pre-made cones offer a convenient and reliable way to create beautiful henna designs. The paste is consistently smooth, the color is rich, and the cones are easy to handle. While the price point is slightly higher than some other brands, the quality and ease of use justify the cost. From a practical standpoint, the user experience is excellent, even for those with little to no prior henna experience. The henna delivers on its promise of a dark, long-lasting stain, provided that proper aftercare is followed. The packaging is well-designed and keeps the cones fresh.
Pros:
- Consistent quality and smooth consistency
- Easy-to-use cone design
- Dark and long-lasting stain
- Natural ingredients
- Pleasant aroma
Cons/Limitations:
- Slightly higher price point
- May not be suitable for individuals with severe skin sensitivities (always perform a patch test)
- Requires proper aftercare to achieve optimal results
Ideal User Profile: Henna Caravan pre-made cones are best suited for individuals who value convenience, quality, and predictable results. They are an excellent choice for beginners who want to learn henna techniques without the hassle of making their own paste. They are also a great option for experienced artists who want a reliable and consistent product.
Key Alternatives: Two main alternatives are Earth Henna and Mihenna. Earth Henna is known for its organic ingredients, while Mihenna offers a wide range of stencil designs.
Expert Overall Verdict & Recommendation: Based on our detailed analysis and testing, we highly recommend Henna Caravan pre-made cones for anyone looking for a convenient, reliable, and high-quality henna experience. The consistent quality, easy-to-use design, and natural ingredients make it an excellent choice for both beginners and experienced artists.
Insightful Q&A Section
- Q: How long should I leave the henna paste on for the darkest stain?
A: For the darkest stain, aim to leave the henna paste on for at least 2-6 hours, or even overnight if possible. The longer the paste stays in contact with your skin, the more dye will be absorbed.
- Q: Can I use a hairdryer to speed up the drying process?
A: While you can use a hairdryer on a low, cool setting to gently speed up the drying process, be careful not to overheat the henna paste. Overheating can cause the paste to crack and flake off prematurely, resulting in a lighter stain. It’s generally best to allow the paste to dry naturally.
- Q: How can I protect my henna design while sleeping?
A: To protect your henna design while sleeping, wrap it loosely with medical tape or a bandage. This will prevent the paste from smudging and transferring to your bedding. You can also wear a glove or sock over your hand to further protect the design.
- Q: What’s the best way to remove stubborn henna paste?
A: If the henna paste is proving difficult to remove, try applying a generous amount of oil (such as coconut oil or olive oil) and gently massaging the area. The oil will help to loosen the paste and make it easier to scrape off.
- Q: Will swimming affect my henna stain?
A: Swimming, especially in chlorinated water, can cause your henna stain to fade more quickly. To protect your design, apply a waterproof barrier cream or petroleum jelly before swimming. You can also try wearing gloves or avoiding prolonged exposure to water.
- Q: Can I apply sunscreen over my henna design?
A: Yes, you can apply sunscreen over your henna design. In fact, it’s recommended to protect your skin from sun damage. Choose a sunscreen with a high SPF and apply it liberally to the area.
- Q: How do I store leftover henna paste?
A: Leftover henna paste can be stored in the freezer for up to six months. Wrap the paste tightly in plastic wrap or place it in an airtight container to prevent it from drying out. When you’re ready to use the paste, thaw it completely at room temperature before applying.
- Q: Can I use henna on other parts of my body besides my hands?
A: Yes, you can use henna on other parts of your body, such as your feet, arms, or back. However, avoid applying henna to sensitive areas, such as your face or genitals.
- Q: How can I make my henna stain last longer?
A: To make your henna stain last longer, follow the aftercare instructions carefully, avoid harsh chemicals, and keep your skin moisturized. You can also try exfoliating your skin before applying henna to remove dead skin cells and create a smoother surface.
- Q: Is it safe to use henna during pregnancy?
A: While pure henna is generally considered safe, it’s always best to consult with your doctor before using henna during pregnancy. Avoid using black henna, as it contains chemicals that can be harmful to your baby.
Conclusion
Simple hand henna tattoos offer a beautiful and accessible way to express your creativity and adorn your skin with temporary art. By following the tips and techniques outlined in this guide, you can create stunning designs that reflect your personal style and celebrate the rich cultural heritage of henna. Remember to choose high-quality henna, practice proper application techniques, and follow the aftercare instructions carefully for the best results. Embrace the joy of henna and discover the beauty of simple hand henna tattoos. Share your experiences with simple hand henna tattoos in the comments below. Explore our advanced guide to [related topic] for more in-depth information. Contact our experts for a consultation on simple hand henna tattoos.
